Whether you're starting from scratch, or have selected a Platform Template, or Report Template, you may modify the HTML and CSS of your marketing dashboard to match your branding or website design. Choosing to do so requires intermediate to expert skills, and we recommend using the free CSS and HTML tutorials at W3Schools.org if you need assistance with code.
- SEO
- Rank Tracker
- Local SEO
- Mobile SEO
- Link Manager
- Landing Pages
- Social Signals
- On-Page Optimization
- Enterprise SEO Solutions
- Marketing
- Competition Analysis
- Insight Graph
- Keyword Research
- Graphs & Widgets
- Market Reach
- Marketing KPI
- Brand Visibility
- White Label SEO
- Marketing Dashboard
- Client Dashboard
- PDF Reports
- PDF Templates
- Other
- Email Notifications
- Portfolio Management
- Integrations
- Google Analytics
- Search Console
- Pay Per Click
- WeDevelop
- API
Marketing Dashboard Layout & Design Customization (Advanced Skills)
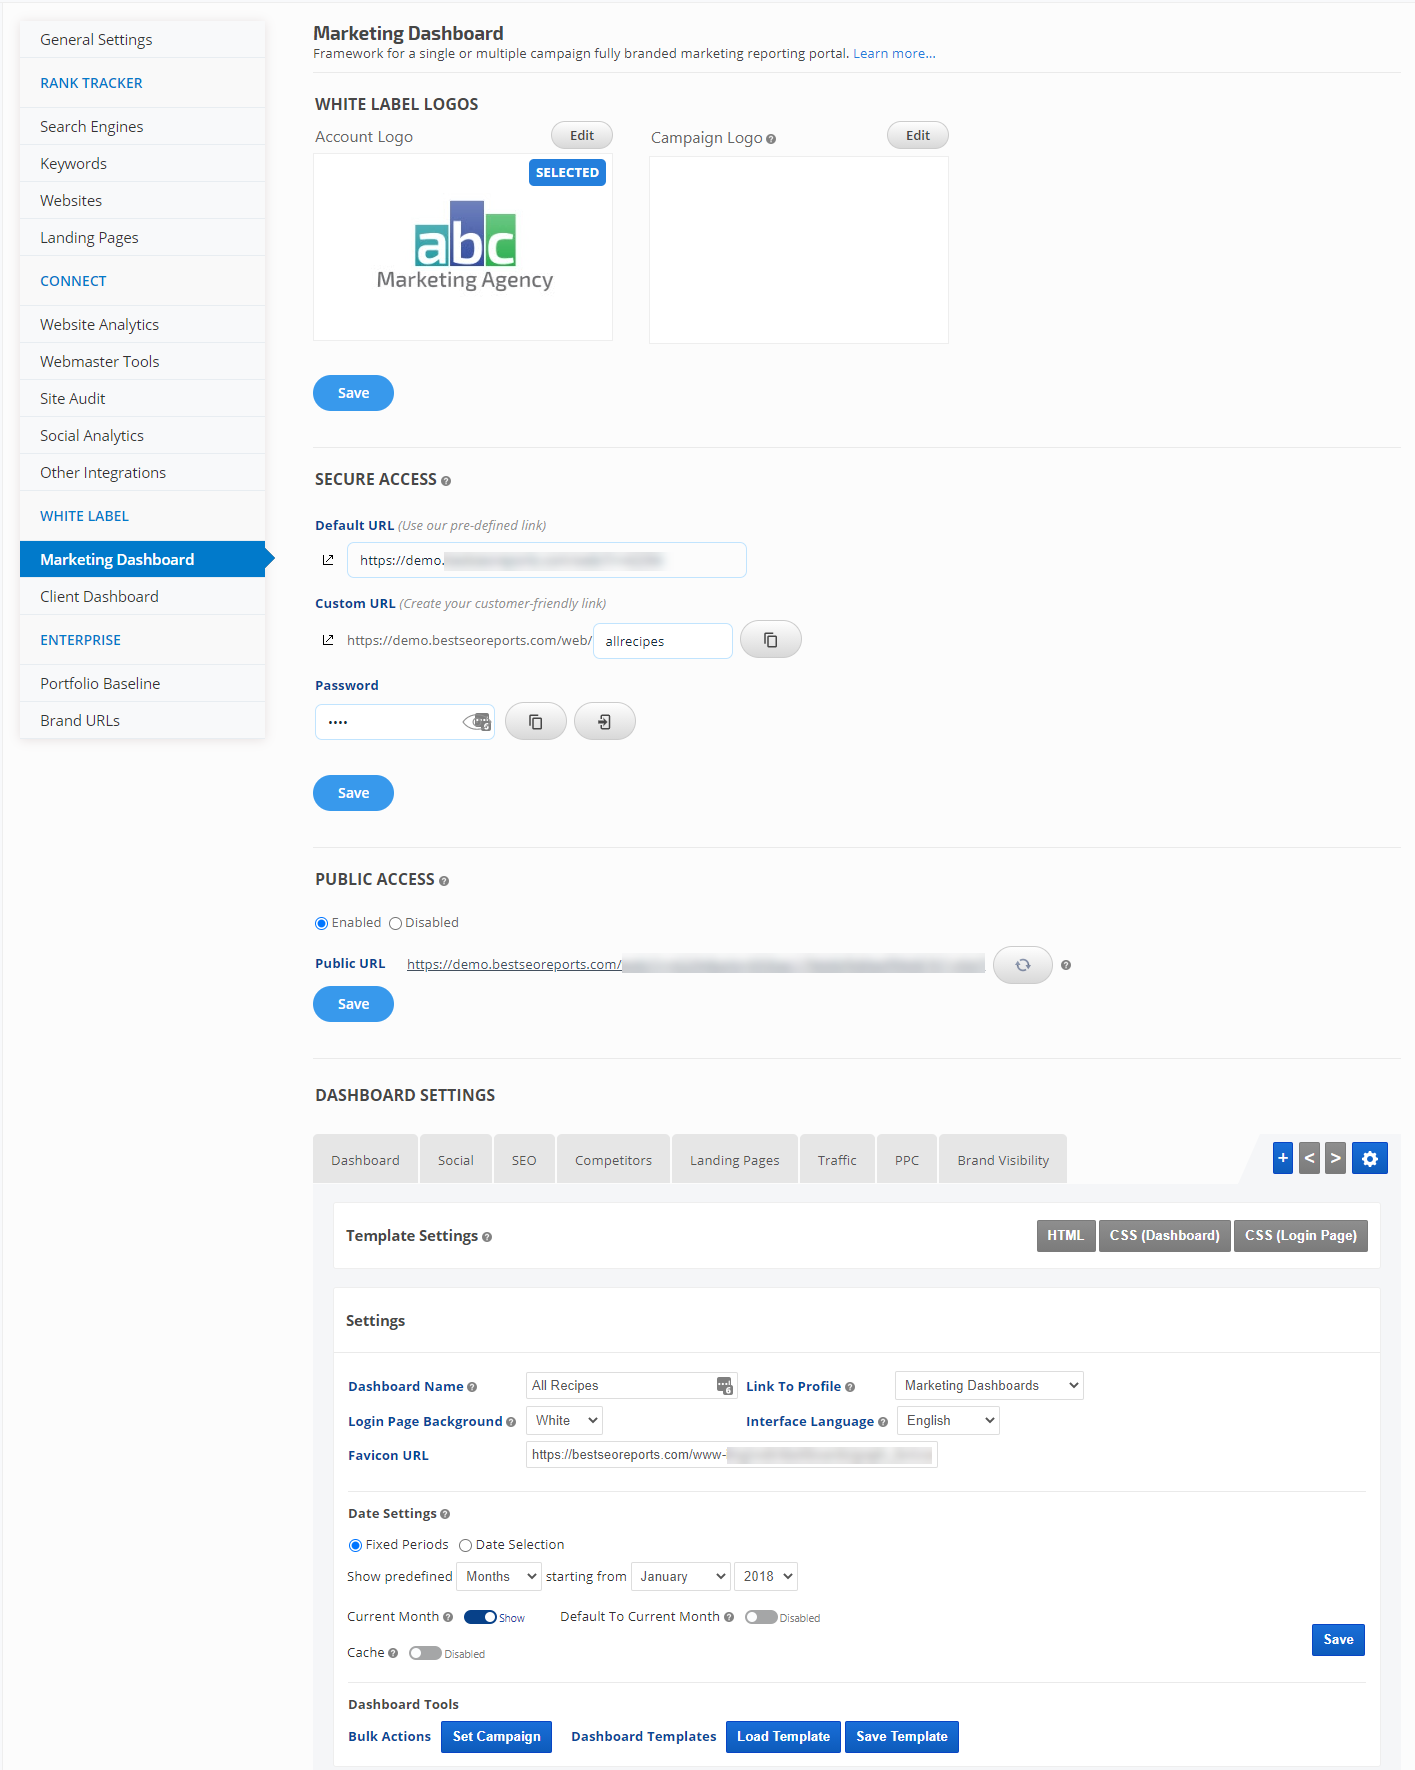
Access Marketing Dashboard Settings
There are two ways to access your Marketing Dashboard settings:
Campaign Settings > Marketing Dashboard
- Campaign Settings > Marketing Dashboard
- White Label > Dashboards
Campaign Settings > Marketing Dashboard
- On the home screen or inside any report, click the gear icon for the campaign and select Campaign Settings.
- In the left sidebar select Marketing Dashboard
White Label > Dashboards
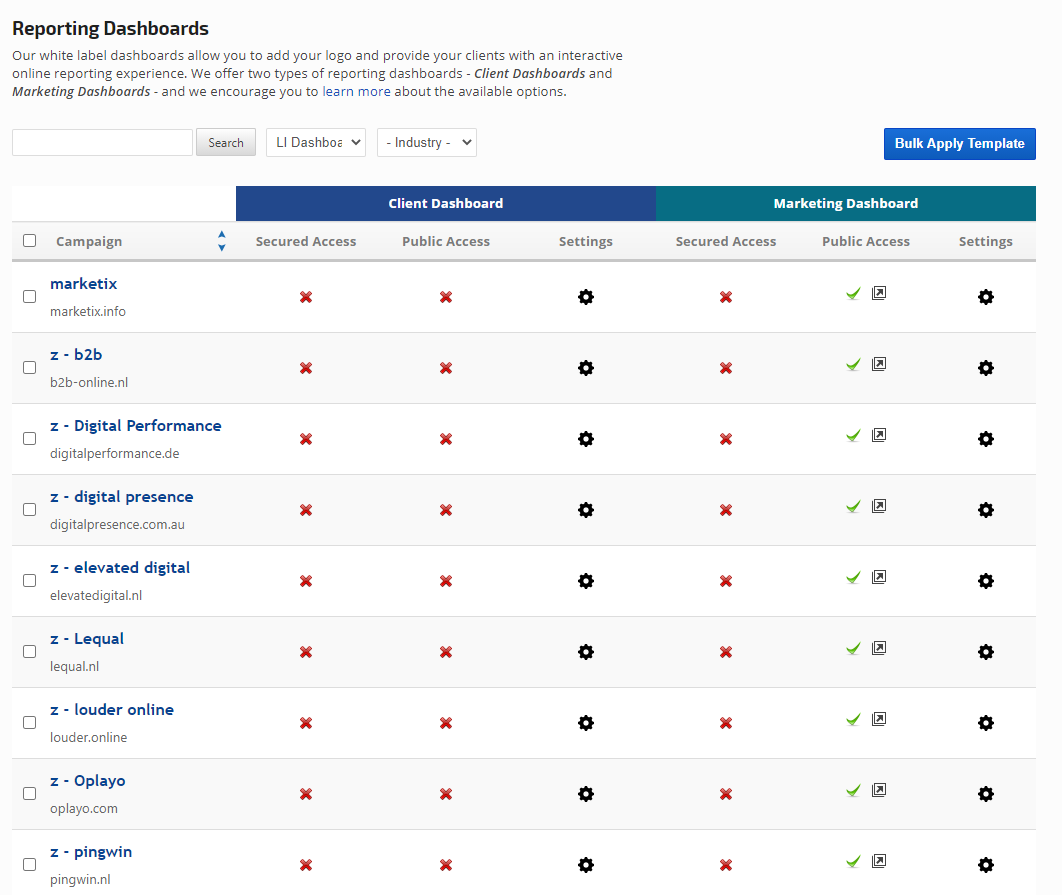
- In the top navigation menu hover over White Label and click on Dashboards
- In the Marketing Dashboard section Settings column, click the settings icon (gear) corresponding to the campaign for which you want to create or edit a marketing dashboard.
HTML: Layout
The HTML Template Settings allow you to set the structure of your marketing dashboard, for example:
Default HTML Settings
If you haven't applied a design template to your dashboard, then the default HTML settings will look similar to this.
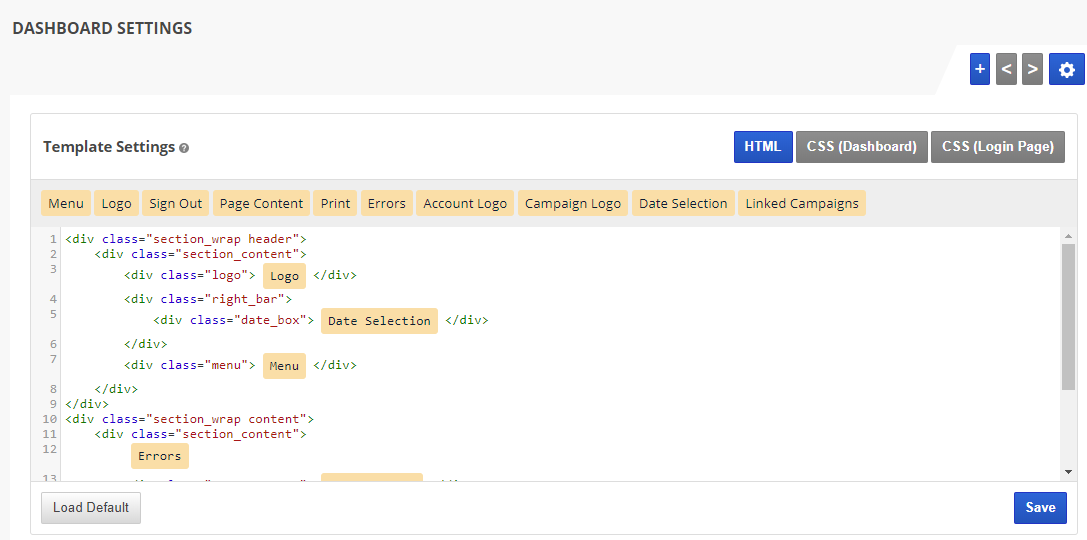
If you make changes and aren't happy with them, you can easily revert by clicking the Load Default button and this default code will replace the changes you've made. Click the Save button.
- choice of the default logo or specifying Account Logo and/or Campaign Logo
- inclusion of the Date Selection menu
- addition of Linked Campaigns for single sign on to multiple related campaigns (requires campaign Profiles)
- addition of a Print button
- inclusion of a Sign Out button (recommended)
- display of error messages if reports that use 3rd party data are inserted but the connection is not valid (e.g., Google Analytics, Twitter, Facebook, etc.)
- Copyright content in the footer
- Other content that you might choose to display in the header area
Default HTML Settings
If you haven't applied a design template to your dashboard, then the default HTML settings will look similar to this.
If you make changes and aren't happy with them, you can easily revert by clicking the Load Default button and this default code will replace the changes you've made. Click the Save button.
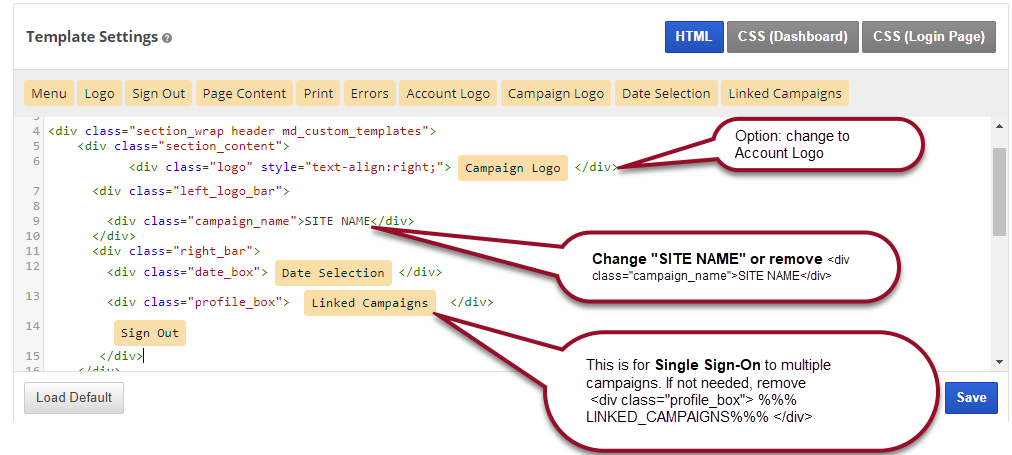
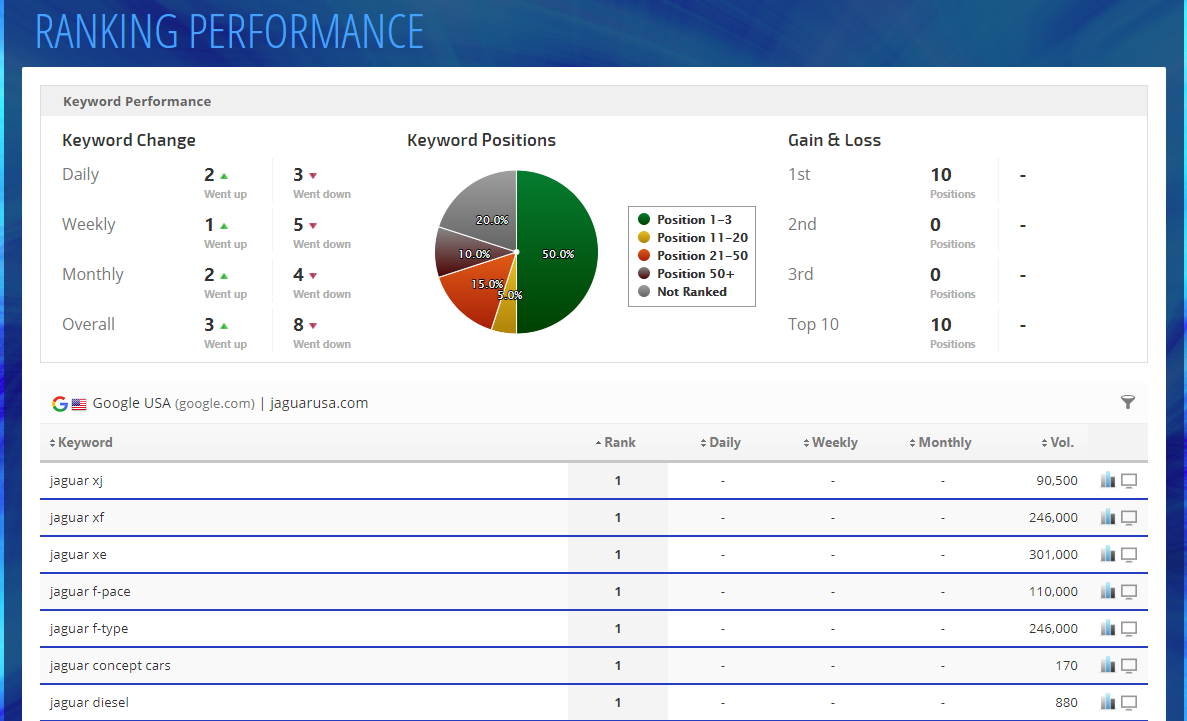
Platform Template HTML
If you have loaded one of our Platform Templates, then your HTML may look more like this. You may opt to:
If you have loaded one of our Platform Templates, then your HTML may look more like this. You may opt to:
- Change Campaign Logo to Account Logo by clicking in and deleting "Campaign Logo" and then click the Account Logo button in it's place
- Enter a Site Name or delete the campaign_name div class line (including "SITE NAME" and the closing div tag)
- Remove the div class profile_box line (including "Linked Campaigns" and the closing div tag) if you don't want to use single sign-on to multiple campaigns.
- Make additional changes to the HTML if you possess intermediate to expert level skills in this area
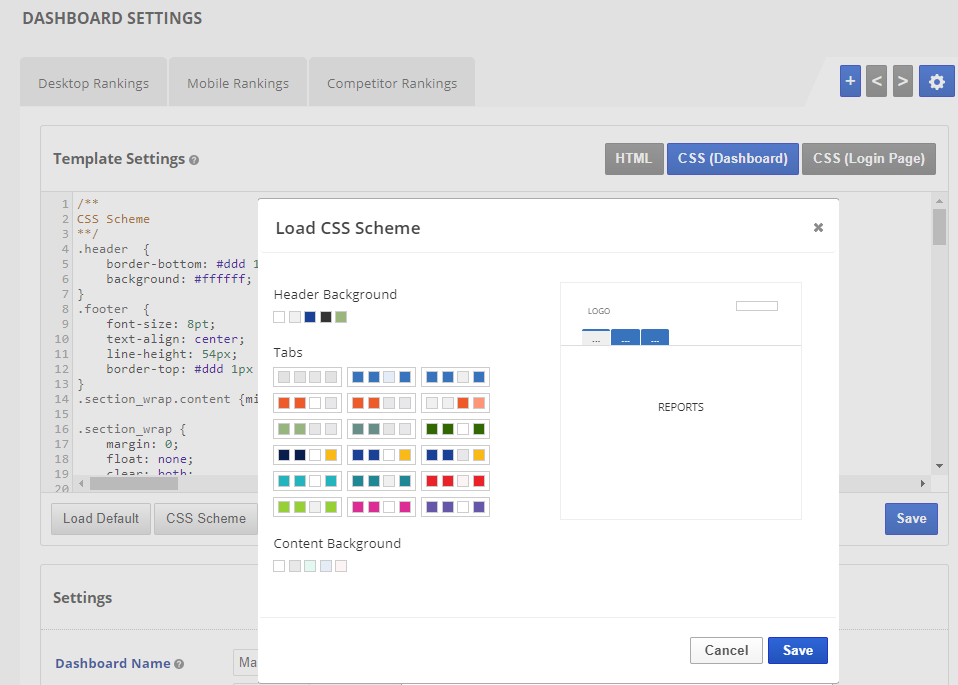
CSS Color Schemes
How to use a Quick Select CSS Scheme
To create a simple solid color background and 1 or 2-tone menu, you can easily select a color scheme.
To create a simple solid color background and 1 or 2-tone menu, you can easily select a color scheme.
- Click the CSS (Dashboard) button
- Click the CSS Scheme button and choose Header and Content background colors as well as a color palette for the page Tabs.
- Click the Save button.
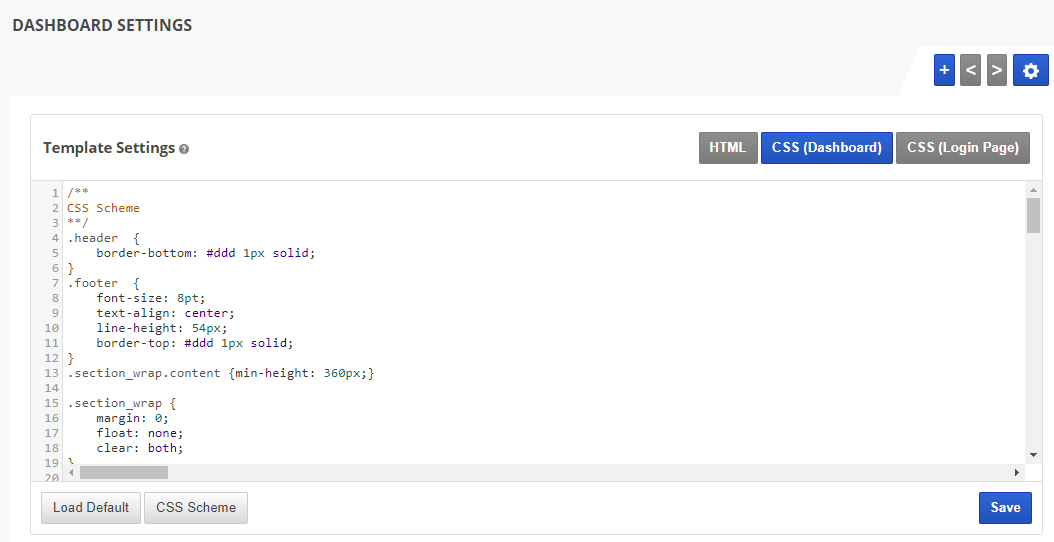
Custom CSS
Customize CSS (Dashboard)
The dashboard's CSS Settings can be modified to match the branding and color scheme of other marketing collateral.

If you change your mind about the new settings you've saved, you can click the:
The dashboard's CSS Settings can be modified to match the branding and color scheme of other marketing collateral.
- Click the CSS (Dashboard) button
- Make additions or changes to the CSS (this requires an intermediate to expert skill level)
- Click the Save button.
If you change your mind about the new settings you've saved, you can click the:
- Load Default button to recover the Rank Ranger default settings
- CSS Scheme button to select a color palette
CSS: Background Image
How to Add a Background Image
It's possible to display a self-hosted image as the background of a marketing dashboard by modifying the body background code like this (replace "your-image-url.jpg" with your actual image URL and the background-color number with the one you want):
For assistance with CSS, please refer to these free tutorials and instructions at W3Schools.org
It's possible to display a self-hosted image as the background of a marketing dashboard by modifying the body background code like this (replace "your-image-url.jpg" with your actual image URL and the background-color number with the one you want):
Dashboard with Image Background example
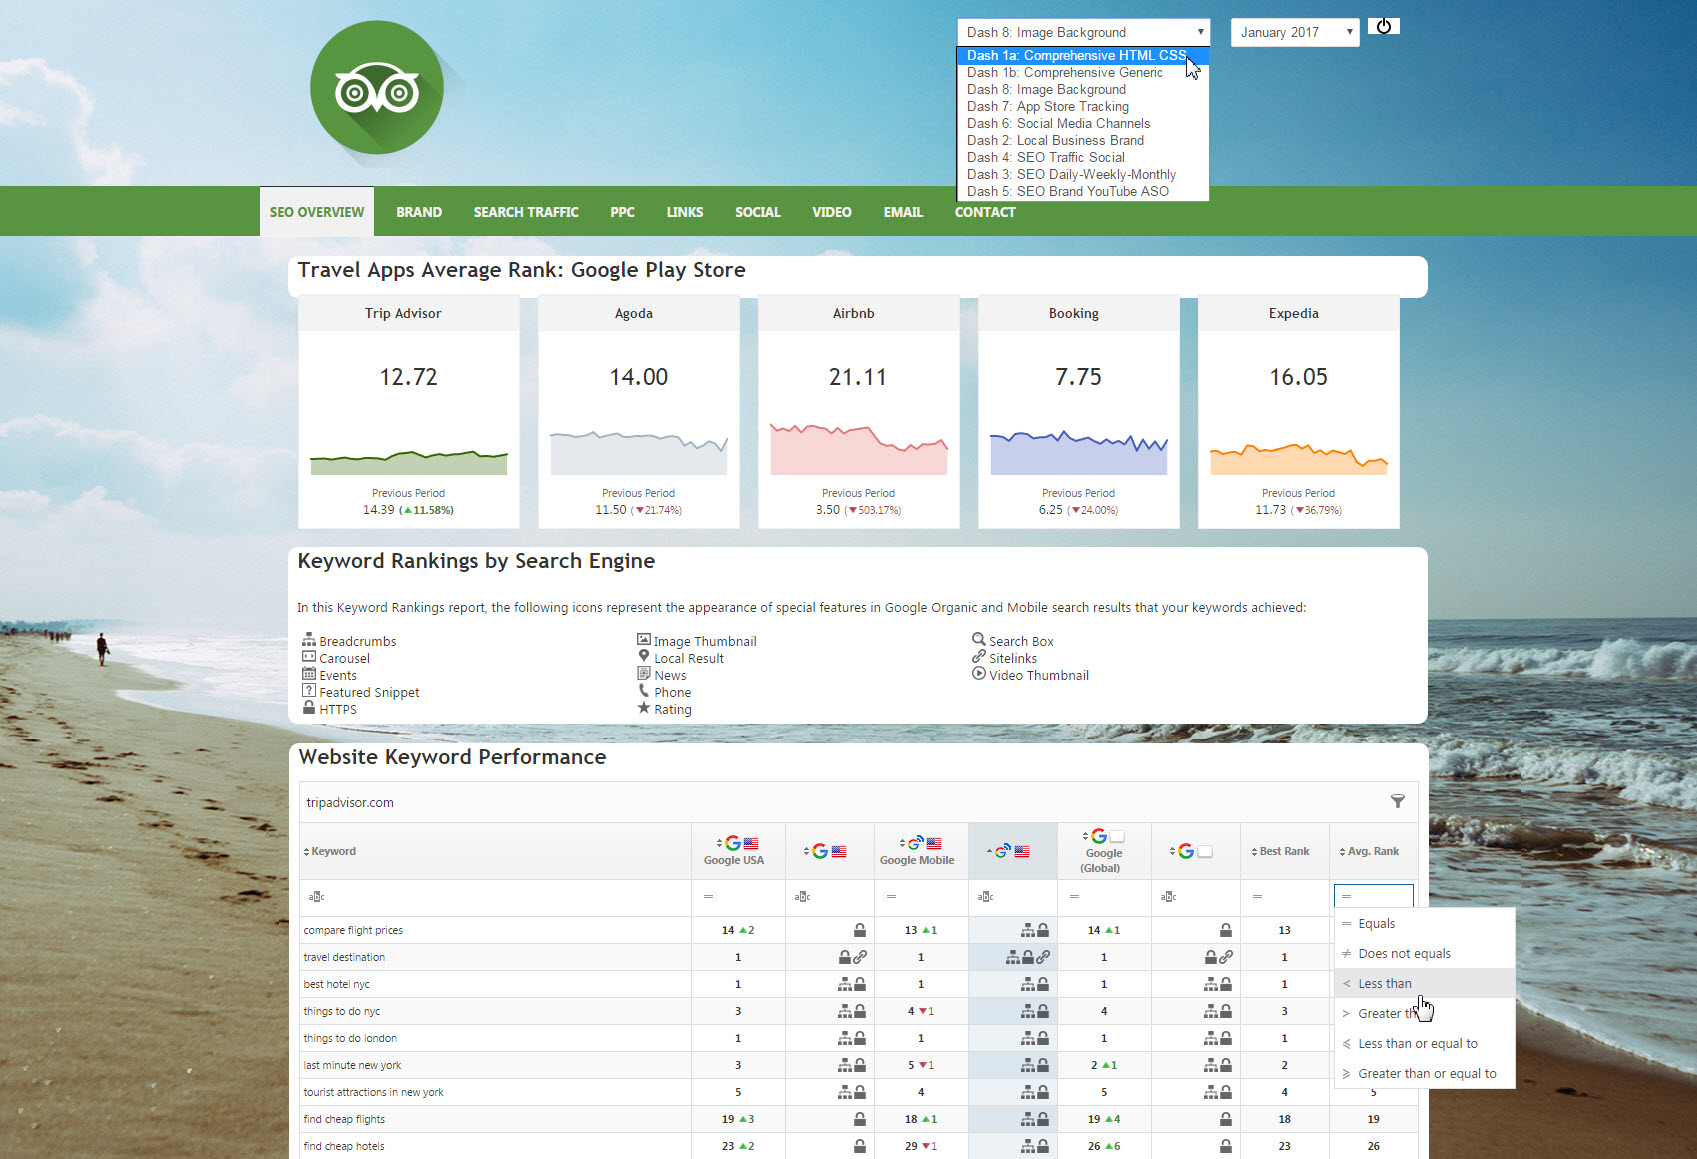
For assistance with CSS, please refer to these free tutorials and instructions at W3Schools.org
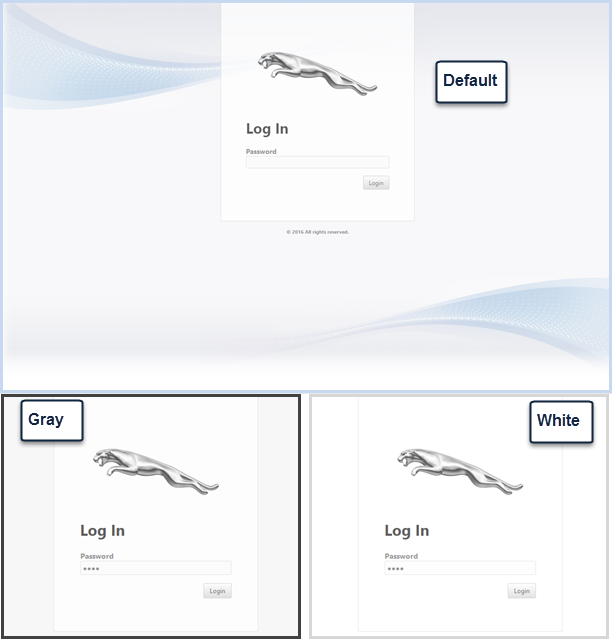
Settings: Login Screen Default Options
If you're using Secure Access for sharing marketing dashboards, you have two options for the style of the login screen:
- Default settings (a built in style, or choice of solid white or gray)
- Custom CSS (for instructions, please refer Design: CSS Login Screen)
Login Screen Background Color Options
If using the Secure Access option, you may choose from default, gray or white login screen backgrounds.
Login Screen Background Settings
The Default background displays unless you select another option in the Login Page Background settings.
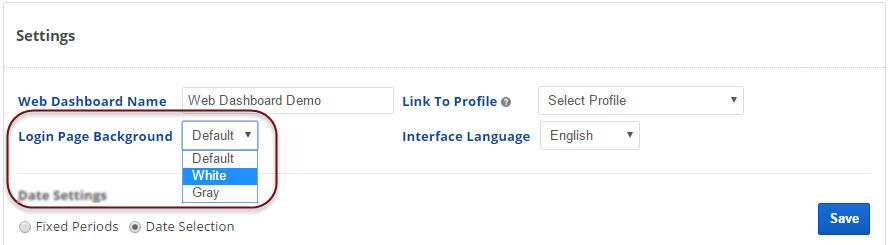
If you make changes, click the Save button.
To customize the login screen with a background image or other formatting, refer to the Dashboard Template Settings > CSS (Log in Page) instructions.
The Default background displays unless you select another option in the Login Page Background settings.
If you make changes, click the Save button.
To customize the login screen with a background image or other formatting, refer to the Dashboard Template Settings > CSS (Log in Page) instructions.
CSS: Login Screen
Customize CSS (Log in Page)
You can match the login screen design to that of your dashboard content screens by clicking the CSS (Log in Page) button and entering the CSS code to compliment the dashboard's design. This is an example of the login page CSS of dashboard that has not had a template loaded.
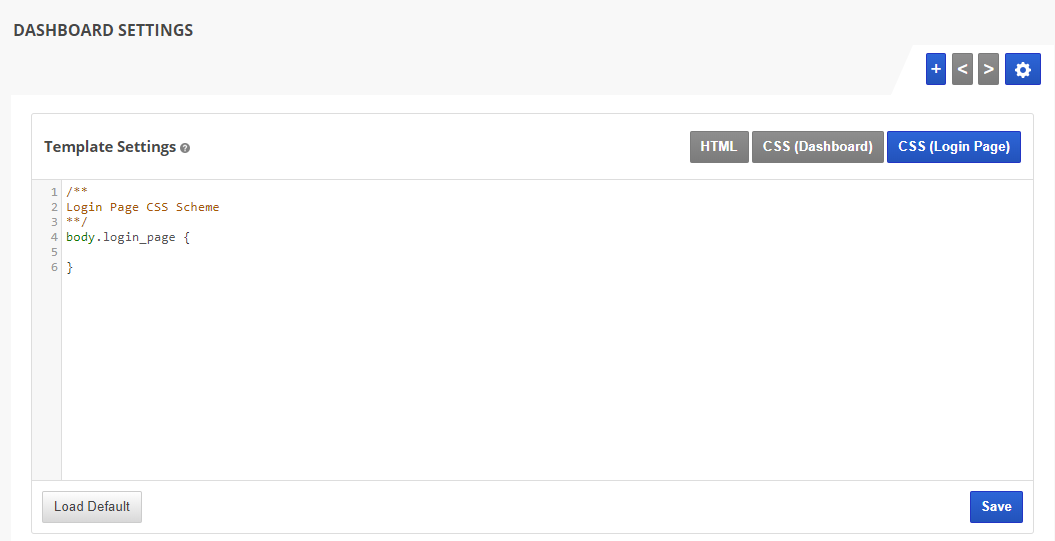
You can match the login screen design to that of your dashboard content screens by clicking the CSS (Log in Page) button and entering the CSS code to compliment the dashboard's design. This is an example of the login page CSS of dashboard that has not had a template loaded.
To add a background replace "your-image-url.jpg" with the URL of a hosted image:
For example, to create a dashboard login screen with an image background like this:
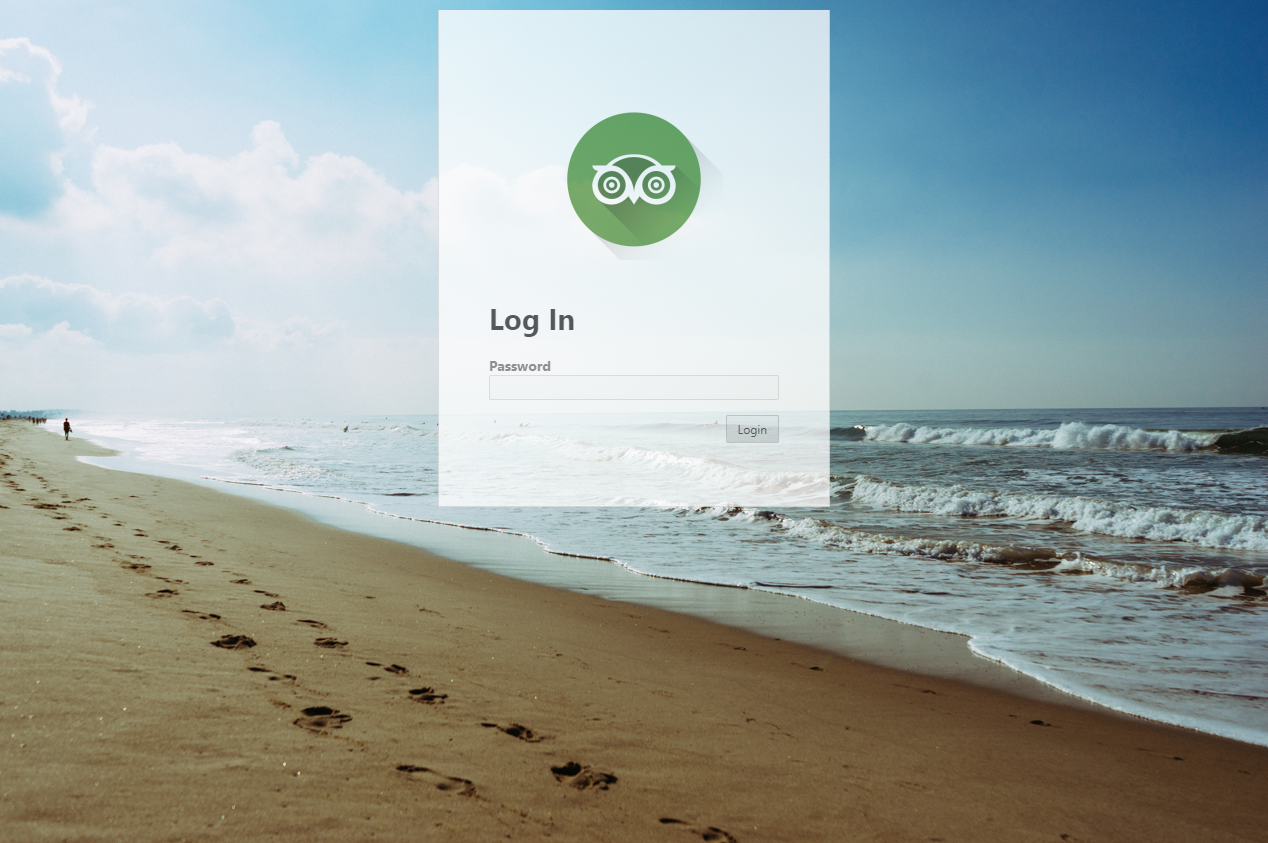
The code might look like this:
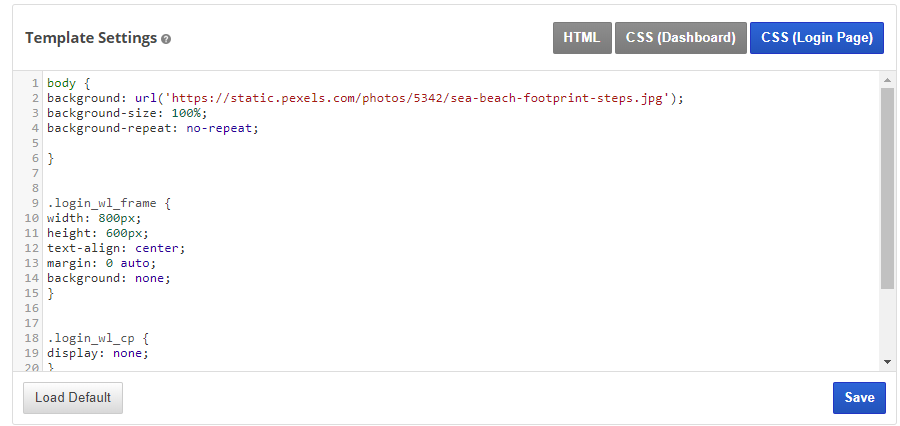
For assistance with CSS, please refer to these free tutorials and instructions at W3Schools.org
The code might look like this:
For assistance with CSS, please refer to these free tutorials and instructions at W3Schools.org
CSS: How to Create a Fixed (Sticky) Menu
Modify CSS
To fix the position of your dashboard's header so that it is always displayed at the top of the screen when a viewer scrolls down the page, you need to modify the header and section_wrap content code in the CSS.
*Note that in the section_wrap content, the padding may need to be adjusted based on the height of your logo and menu style. For example, if your logo has a pixel height of 150 px, then the padding might need to be set at 180px or 200px, or more.
Example of Template 1. Abstract Geometric HTML
Before
AFTER
To fix the position of your dashboard's header so that it is always displayed at the top of the screen when a viewer scrolls down the page, you need to modify the header and section_wrap content code in the CSS.
CSS Header Before:
CSS Header AFTER:
CSS section_wrap content Before:
CSS section_wrap content AFTER*:
*Note that in the section_wrap content, the padding may need to be adjusted based on the height of your logo and menu style. For example, if your logo has a pixel height of 150 px, then the padding might need to be set at 180px or 200px, or more.
Customizing Platform Templates
If you're using one of our built-in Platform Templates, in addition to the above changes, you will need to check the HTML to determine if the Menu is inside the Header's DIV tags. If it is not, then you should move the closing DIV tag so that the menu is inside of it.

If you're using one of our built-in Platform Templates, in addition to the above changes, you will need to check the HTML to determine if the Menu is inside the Header's DIV tags. If it is not, then you should move the closing DIV tag so that the menu is inside of it.
Example of Template 1. Abstract Geometric HTML
Before
AFTER
In the above example one of the closing DIV tags that was after the SIGNOUT code was moved to the position after the MENU tags.
For assistance with CSS, please refer to these free tutorials and instructions at W3Schools.org
CSS: Change Table Borders
Default Table Borders
This is the standard table design that is built into the majority of our templates. To add colored borders to your tables, you'll need to add CSS code, examples are provided below.

Colored Border Underlining Table Rows
This is sample code that you can add to the CSS (Dashboard) screen (and click the Save button) to add colored borders to the table rows. You may modify it based on your color and border type preferences.
The above code produces a table that looks like this
Colored Outer Table Border
This is sample code that you can add to the CSS (Dashboard) screen (and click the Save button) to create an outer border to your tables. You may modify it based on your color and border type preferences.
The above code produces a table that looks like this

This is the standard table design that is built into the majority of our templates. To add colored borders to your tables, you'll need to add CSS code, examples are provided below.
Colored Border Underlining Table Rows
This is sample code that you can add to the CSS (Dashboard) screen (and click the Save button) to add colored borders to the table rows. You may modify it based on your color and border type preferences.
The above code produces a table that looks like this
Colored Outer Table Border
This is sample code that you can add to the CSS (Dashboard) screen (and click the Save button) to create an outer border to your tables. You may modify it based on your color and border type preferences.
The above code produces a table that looks like this
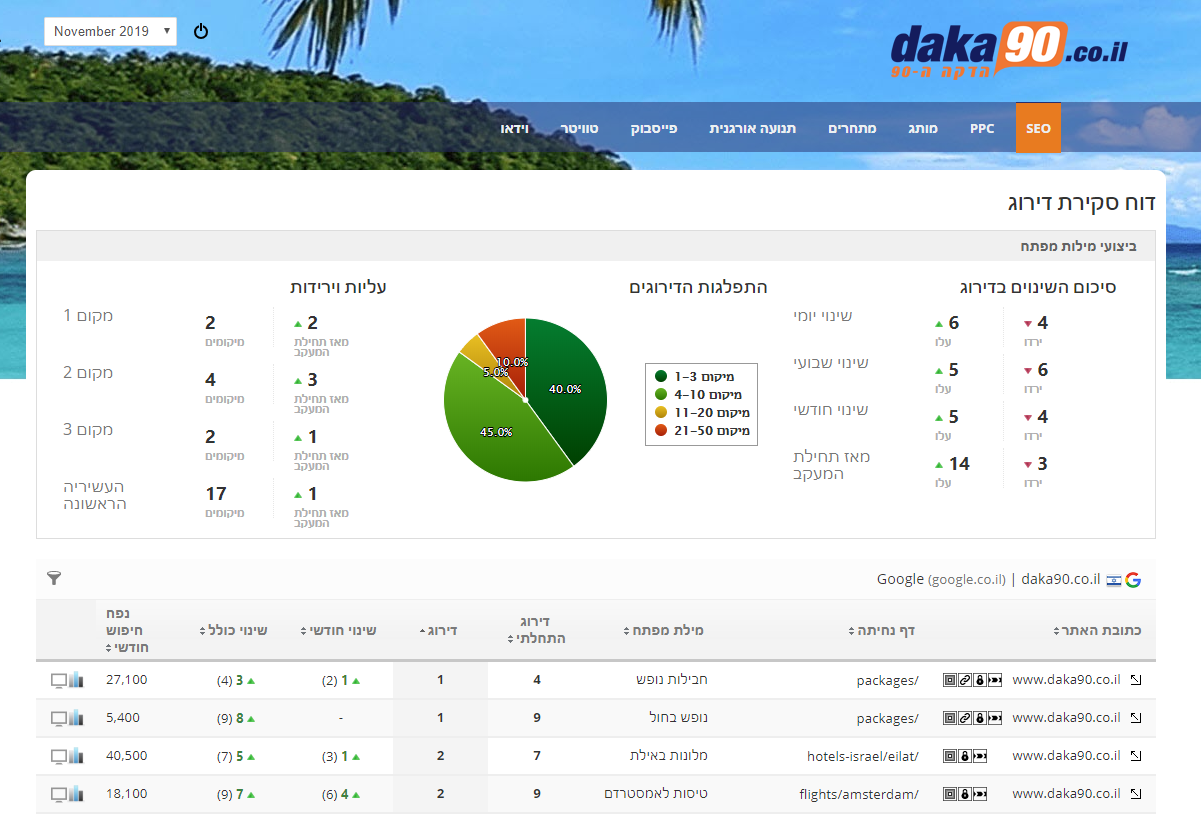
CSS: Support for Right-to-Left Languages
Marketing Dashboards can support right-to-left languages with some changes to the CSS.
Marketing Dashboard RTL Language Example
CSS Samples for RTL Language
In order for a dashboard to display in right-to-left format, direction code needs to be added to some of the CSS styles, and alignment/float needs to be reversed:
The following samples may need to be modified depending upon your color scheme.
Header, Section Content and Grid Sample
Heading Wrap and Table Sample
Menu Sample
These elements need to be changed from left to right alignment
These elements need to be changed from right to left alignment
The above code is provided for sample purposes and may be all you need to change depending upon the template you're using. If you need further assistance designing a RTL dashboard, we recommend using the free CSS and HTML tutorials at W3Schools.org
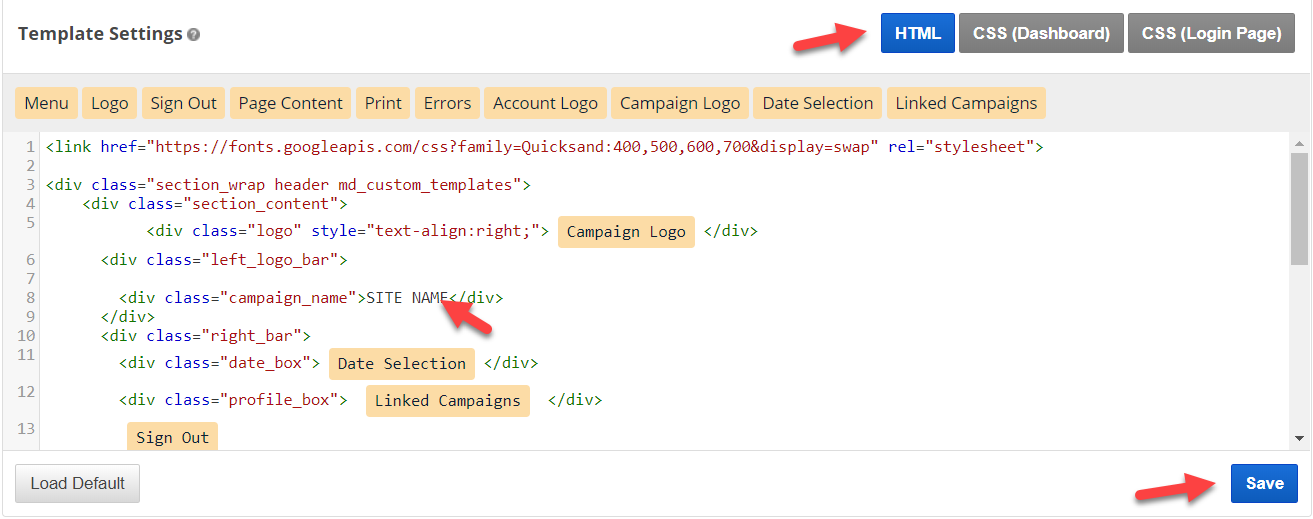
HTML: Change 'Site Name'
The heading: 'SITE NAME', which is displayed on the top of a Marketing Dashboard when loading a system Design Template, can be removed or changed.

How to Change the Heading
- Open Campaign Settings > Marketing Dashboard
- Scroll to Dashboard Settings
- Click the HTML button (in the top right tool bar)
- Find words 'SITE NAME' in the HTML code and delete the line of code or change the text
- Click Save button.
HTML & CSS: Add Print Button
To help dashboard viewers who may not be tech savvy enough to use a browser's print function, there is an option to add a print button.
This is an example of how you might choose to display a print button in the upper right corner of the dashboard to the right of the date selection menu and sign out button.

Create a Print Style
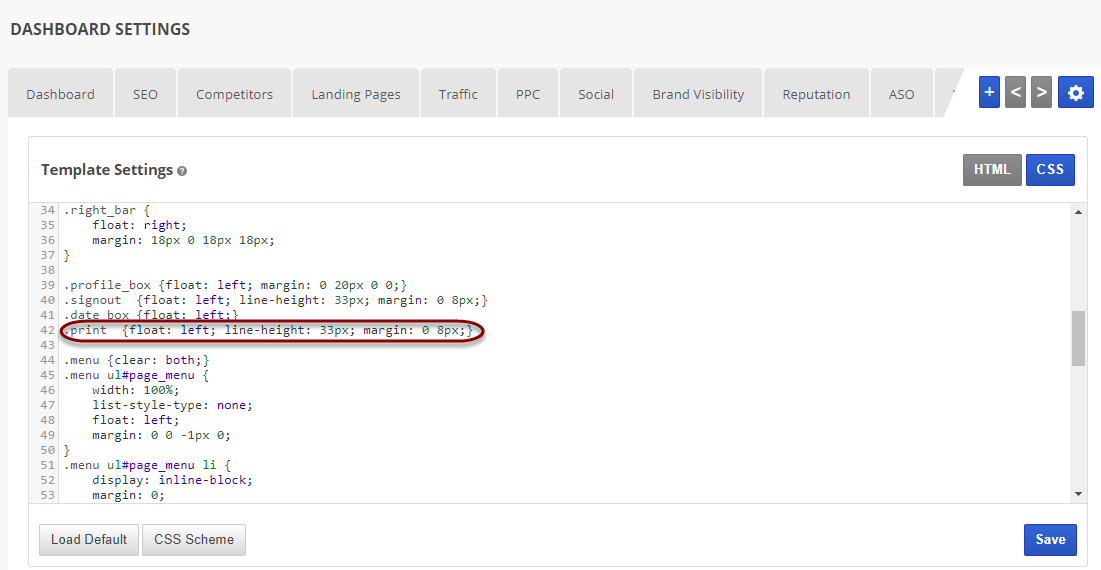
For assistance with CSS, please refer to these free tutorials and instructions at W3Schools.org
- Click the CSS button to access the dashboard style sheet
- Insert code to style the button location and format using a div class reference name (e.g., print)
- Click the Save button.
For assistance with CSS, please refer to these free tutorials and instructions at W3Schools.org
Insert the Print function
To add a print button:
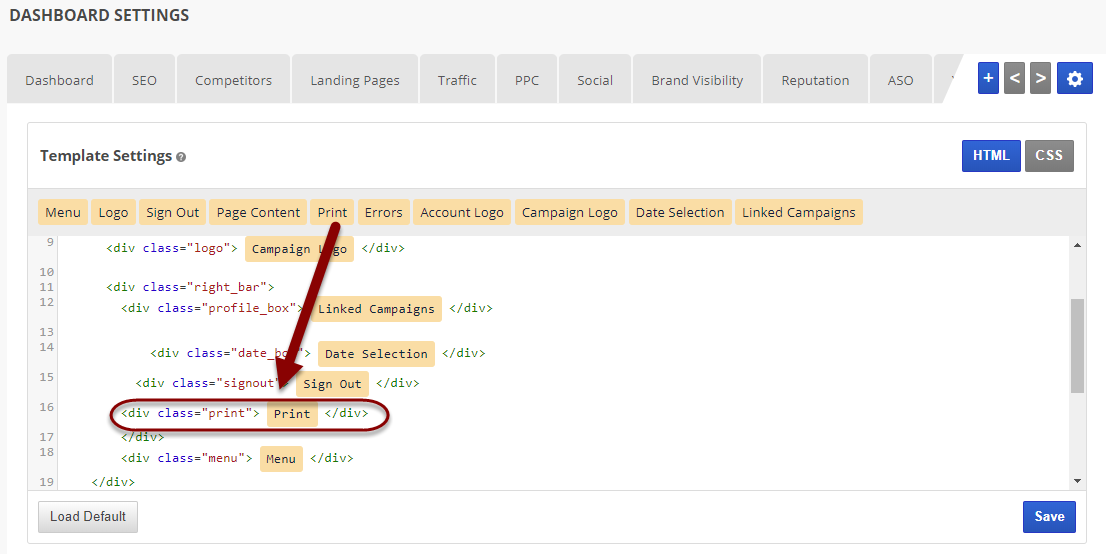
To add a print button:
- Click the HTML button
- Place the cursor in the code location that you want the button to display in and click the Print option.
- Assign a CSS div class to the print button as displayed in this example
- Click the Save button.
The Print function prints the page content without the top logo bar and navigation menu.