- PDF Reports (email message settings)
- Client Dashboards (report selection and options)
- Link Manager (Google Drive document storage)
- Tag Manager (rules)
- Search Console (monthly snapshot archive)
- Custom SEO Metric (formula)
- Platform Report Data Caching & Google Trends setting
- SEO
- Rank Tracker
- Local SEO
- Mobile SEO
- Link Manager
- Landing Pages
- Social Signals
- On-Page Optimization
- Enterprise SEO Solutions
- Marketing
- Competition Analysis
- Insight Graph
- Keyword Research
- Graphs & Widgets
- Market Reach
- Marketing KPI
- Brand Visibility
- White Label SEO
- Marketing Dashboard
- Client Dashboard
- PDF Reports
- PDF Templates
- Other
- Email Notifications
- Portfolio Management
- Integrations
- Google Analytics
- Search Console
- Pay Per Click
- WeDevelop
- API
Account-wide Default Tool Settings
The Default Tool Settings help you save time and ensure accuracy and consistency across staff by selecting account-wide defaults for these marketing tools:
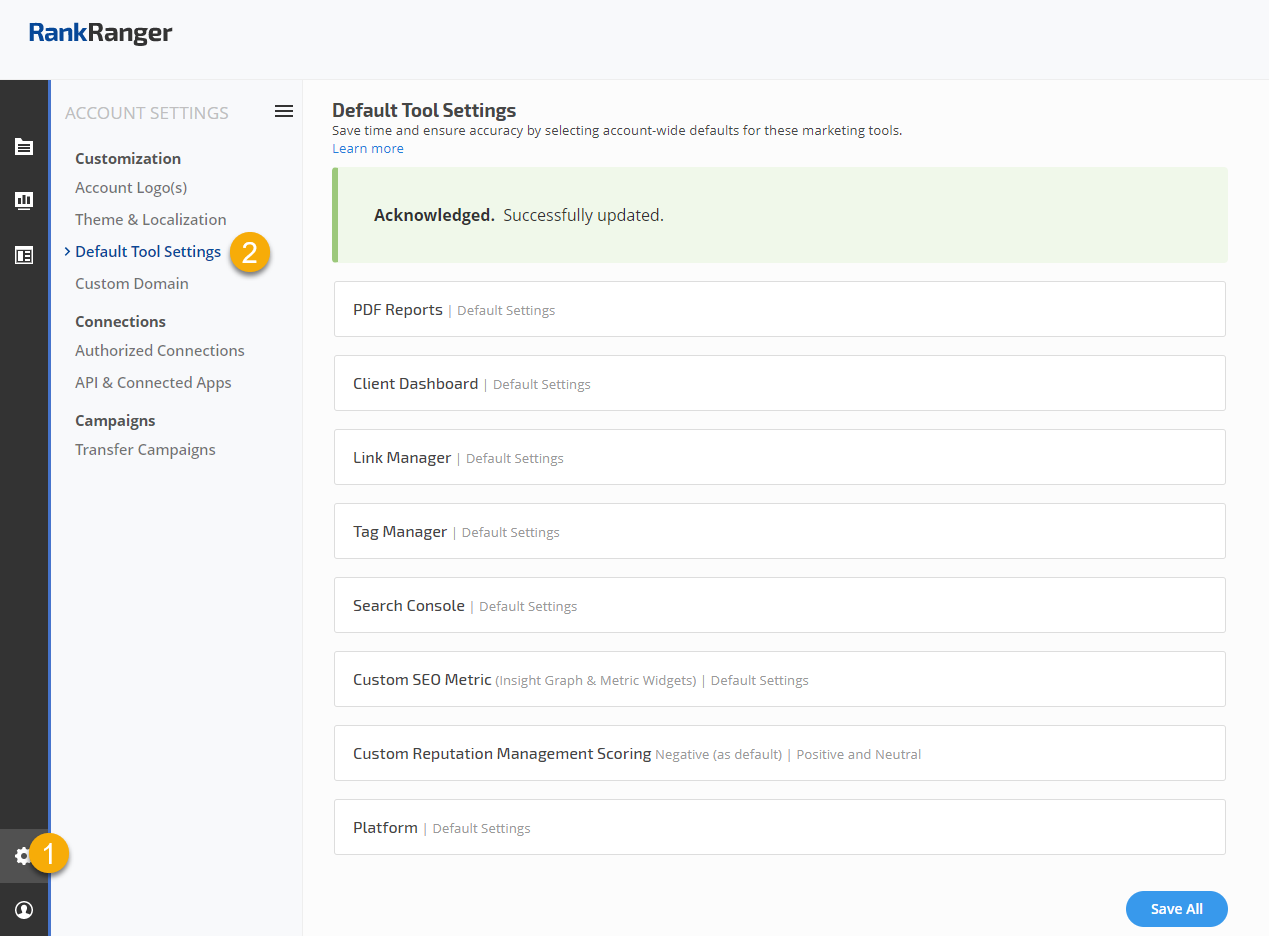
The Default Tool Settings screen is in the My Account section of Rank Ranger, click on the Account in the main menu and scroll to Default Tool Settings.
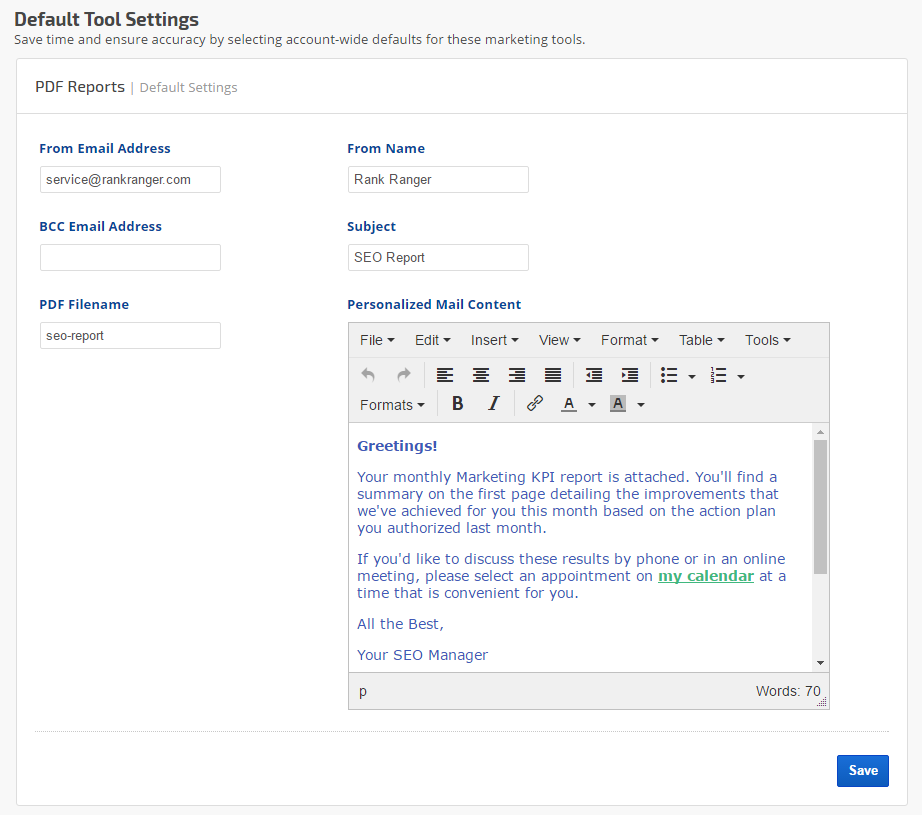
PDF Report Account Default Settings
Standardize White Label PDF Report Email Settings
These global settings will be applied to all White Label PDF Reports that are created after these settings have been saved. The default settings are a time-saving convenience feature, and can be changed in the Report Details screen of individual PDF Reports as needed.
These global settings will be applied to all White Label PDF Reports that are created after these settings have been saved. The default settings are a time-saving convenience feature, and can be changed in the Report Details screen of individual PDF Reports as needed.
- Enter the From Email Address you want displayed as the sender of the message that the PDF report is attached to.
- In the From Name field, enter
the name of the company or person you want displayed as the sender of
the email message that the report is attached to.
- Enter a BCC Email Address if you have someone who should receive a copy of the report without displaying for the other recipients to see. This field could also be used to send yourself a report copy. (Note: Recipient email address(es) must be set in the individual White Label PDF Report Details screen).
- Enter a generic email Subject to display in the subject line of the email message (our system default is "SEO Report"). If you want the date that the report is sent to be in the subject line, you can add %DATE% to it. For example:
Your Marketing Report for %DATE% will display in the recipient's subject line as Your Marketing Report for 04-30-2017 (if the report is sent on April 30th)
The email subject line is limited to a maximum of 78 characters including the date. Additional characters can wrap to a second line in the subject or may be truncated by the recipient mail server.
- If you have a specific filename you want used for all of the reports you send out, enter that in the PDF Filename field (our system default is "SEO Report"). If you want the date that the report is sent to be part of the PDF Filename, you can add %DATE% in the PDF Filename field. For example:
monthly-seo-report-%DATE% will cause the file to be created and named as monthly-seo-report-04.30.2017.pdf (if the report is sent on April 30th). The report filename is limited to a maximum of 255 characters including the date.
- Enter Personalized Mail Content if you have a standard message you want sent with all of your White Label PDF reports. If this field is left blank, the default Rank Ranger message will be sent. The WYSIWYG editor offers the freedom to format the font, add links and insert images that are hosted on the Internet.
- Click the Save button.
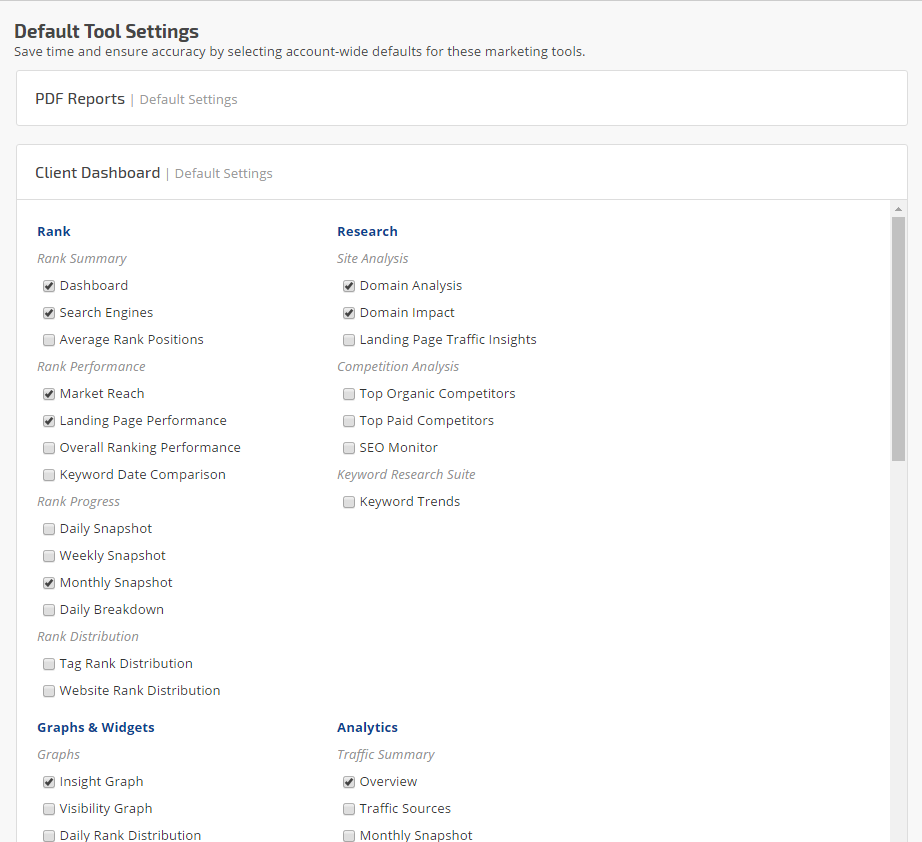
Client Dashboard Account Default Settings
These are global settings that will be applied to the Client Dashboards of all new campaigns that you create after these settings have been saved. Settings can be changed for individual campaigns in Campaign Settings as needed.
Report & Graph Selection
Check the box for each report you want displayed in the white label Client Dashboard for all campaigns.
Check the box for each report you want displayed in the white label Client Dashboard for all campaigns.
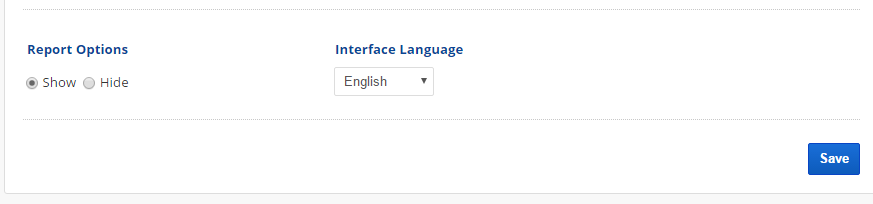
Display Options
Choose to Show or Hide the Report Options panel that displays in the left menu of the Client Dashboard. Showing this feature will make it possible for anyone with access to one of your dashboards to change the display of metrics and filters for the reports you've enabled for their viewing in that dashboard.
Select a Client Dashboard Interface Language only if you want it to be different than the global account language selected at the top of this screen.
Click the Save button.
Campaign Report Default Options
Individual reports and graphs can be customized and saved as Client Dashboard default per campaign, simply:
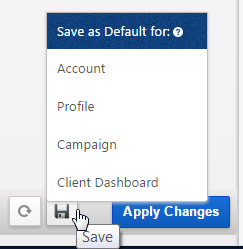
Individual reports and graphs can be customized and saved as Client Dashboard default per campaign, simply:
- Expand the Report Options after clicking the Apply Changes button
- Hover over the Save icon and select "Save as Default for: Client Dashboard"
Link Manager File Storage in Google Drive
Connect Google Drive with Link Manager for Link-related Documents
Connecting a Google Drive to your Link Manager will allow you to attach files (e.g., invoices, link exchange agreements, etc.) to individual Link records.
Connecting a Google Drive to your Link Manager will allow you to attach files (e.g., invoices, link exchange agreements, etc.) to individual Link records.
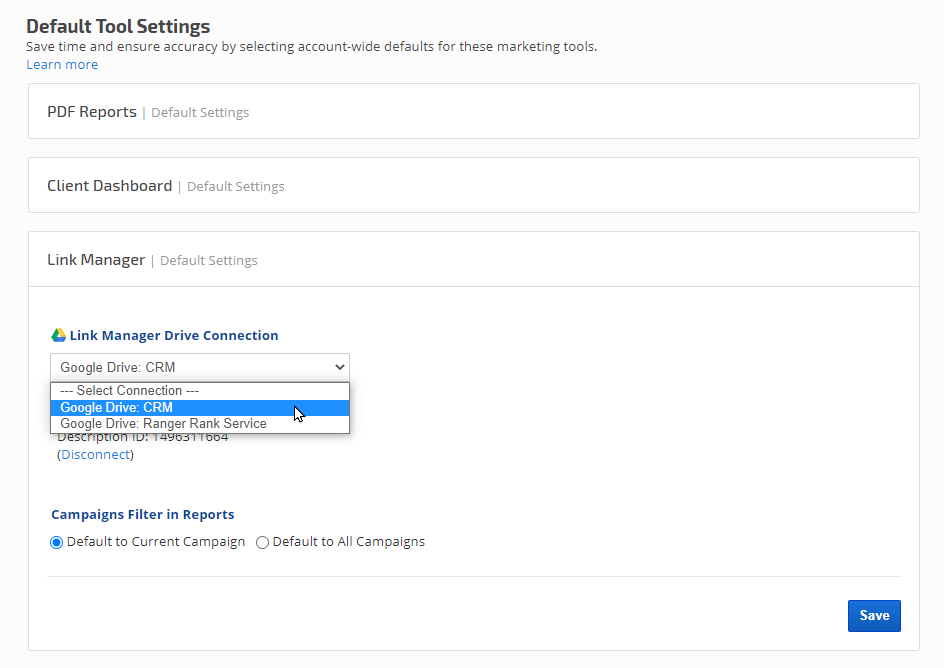
- After connecting a Google Drive account to your Rank Ranger account, open the Account Settings > Default Tool Settings screen
- Expand the Link Manager section
- Select a Drive Connection and click the Save button. When successfully connected, the Google Drive user's name and usage statistics display.
- Set either to Current Campaign or to All Campaigns (which will set a default display setting for the links in the Report Options)
Add Files to Link Details
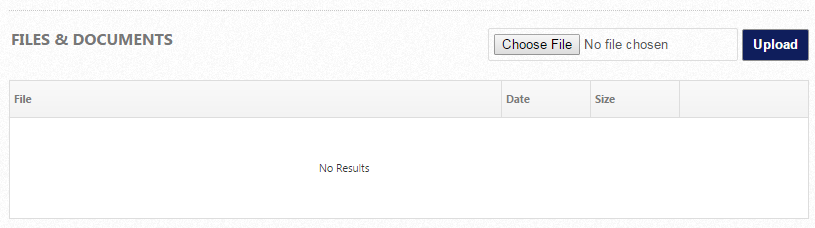
After connecting a Google Drive to Link Manager, open the Reports > Organic Search > Link Manager > Links screen and click the Edit (pencil) icon for an individual link.

- Scroll down the screen to the Files & Documents section.
- Click the Choose File button, navigate to and select the file on your computer.
- Click the Upload button
Successful File Upload to Google Drive
When files display in the Files & Documents section of a Link Details screen, they have been successfully uploaded to the Google Drive account connected in the Localization & Settings screen. From here authorized users of the Rank Ranger account can download or delete the files.

When files display in the Files & Documents section of a Link Details screen, they have been successfully uploaded to the Google Drive account connected in the Localization & Settings screen. From here authorized users of the Rank Ranger account can download or delete the files.
Google Drive Link Manager Folders
Each individual Link is assigned an ID in the Link Manager and those IDs become the folder names in the Google Drive connected to the Rank Ranger account. Folders can be shared, renamed and moved to other locations in Google Drive as needed. Files can be deleted from the Link Details screen by an authorized user* or from Google Drive.

Each individual Link is assigned an ID in the Link Manager and those IDs become the folder names in the Google Drive connected to the Rank Ranger account. Folders can be shared, renamed and moved to other locations in Google Drive as needed. Files can be deleted from the Link Details screen by an authorized user* or from Google Drive.
*By default, a user can only manage the links s/he created unless "Manage Account Links" permission is granted by the account administrator (refer to Manage Users permissions).
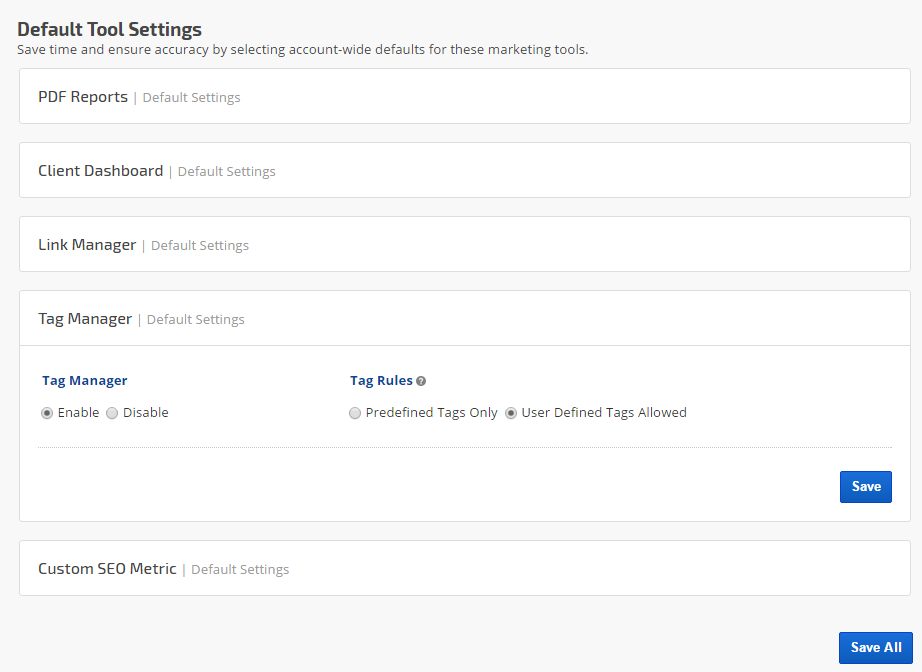
Tag Manager Account Default Settings
Set Tag Manager Rules
Tag Manager is an account-wide feature that allows you to define Tag Groups and their available options, and establish rules regarding their use for keywords in rank tracking campaigns
Select Enable to turn on the Tag Manager feature.
Select the rule:
Tag Manager is an account-wide feature that allows you to define Tag Groups and their available options, and establish rules regarding their use for keywords in rank tracking campaigns
Select Enable to turn on the Tag Manager feature.
Select the rule:
- Predefined Tags Only: restricts users from defining new tags. they must select tags that exist in Tag Manager
- User Defined Tags Allowed: provides the user with the option to select a Predefined Tag or create new tags.
Custom SEO Metric Account Default Settings
Create your own custom SEO metrics in our Insight Graph or Metric Widgets by setting the values involved in the calculation of estimated potential clicks per month.
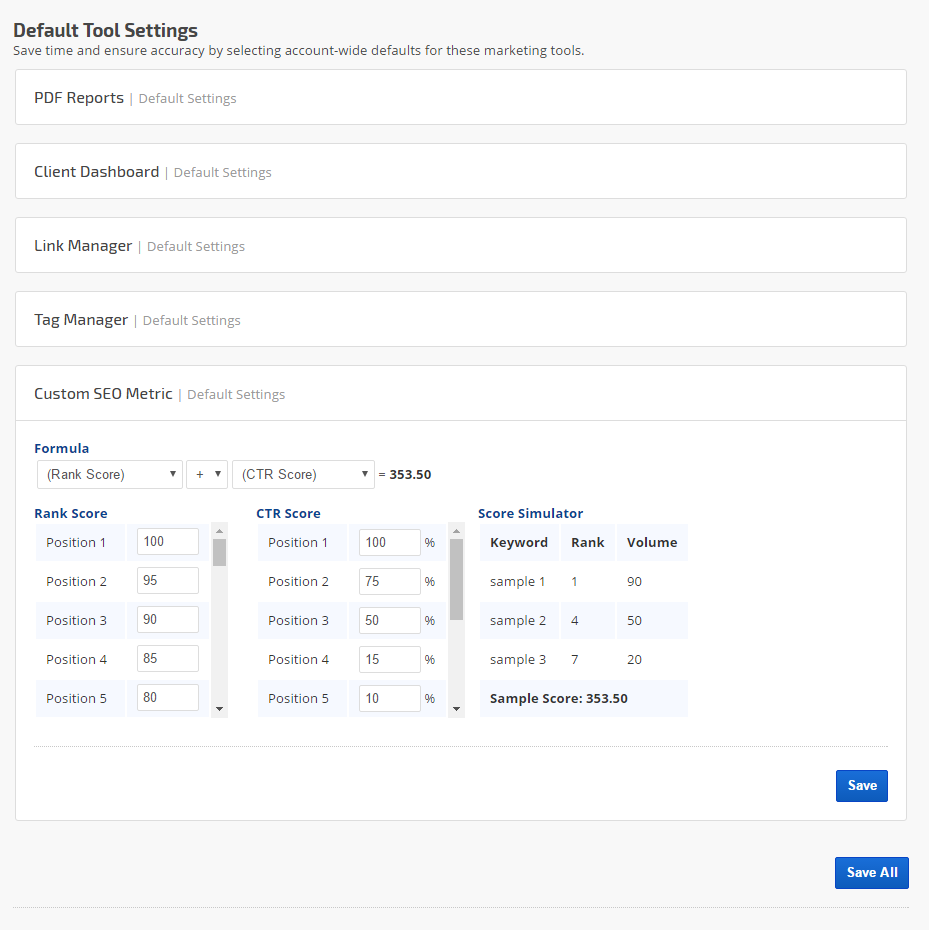
Custom SEO Metric Formula Options
This tool allows you to set the value of keywords that rank in positions 1 through 100. For example, a keyword that ranks in position 1 and has a monthly search volume of 5000 will have a higher potential click through rate than a keyword ranked in position 1 with a monthly search volume of 100.
This tool allows you to set the value of keywords that rank in positions 1 through 100. For example, a keyword that ranks in position 1 and has a monthly search volume of 5000 will have a higher potential click through rate than a keyword ranked in position 1 with a monthly search volume of 100.
- Select your preferred formula (more information below)
- In the Rank Score section enter the numbers you want to be attributed to each of the top 100 search engine result positions
- In the CTR score section make any adjustments you want for the top 10 positions
- Click the Save button
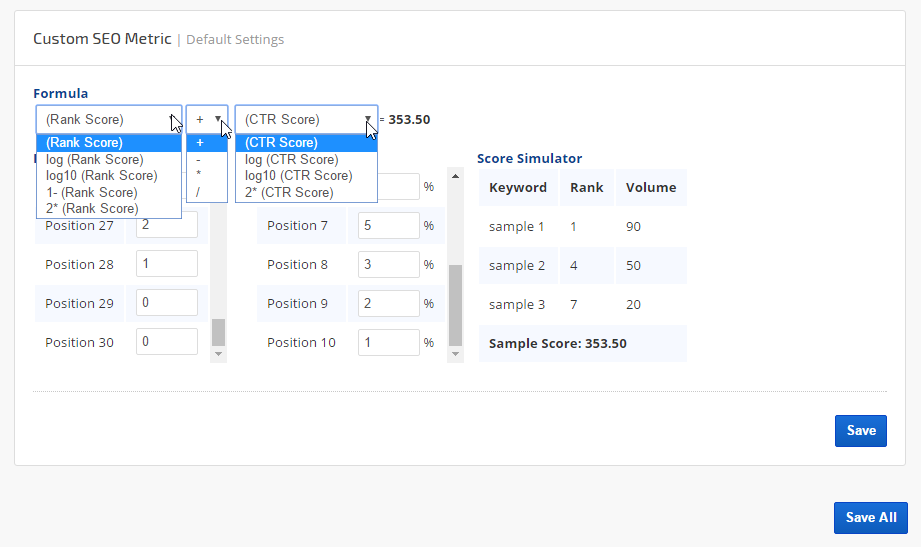
Formula options include any combination of these:
Rank Score
The Rank Score is generated based on the values that you enter for position 1, 2, 3, etc. and the number of keywords ranked in each position For example, if a campaign has 20 keywords ranking as follows, then the Rank score is 1885:
- Position 1 (100): x 10 keywords = 1000
- Position 2 (95): x 2 keywords = 190
- Position 3 (90): x 5 keywords = 450
- Position 4 (85): x 1 keyword = 85
- Position 5 (80): x 2 keywords = 160
Options include:
Operators
- Plus
- Minus
- Multiply
- Divide
- (CTR Score)
- log (CTR Score)
- log10 (CTR Score)
- 2* (CTR Score)
Search Console Historical Data Storage
Search Console Monthly Snapshots
In each campaign's Webmaster Tools setting screen, you can enable the Historical Data Storage option that causes the following Search Console data to be stored based on calendar months without filters:
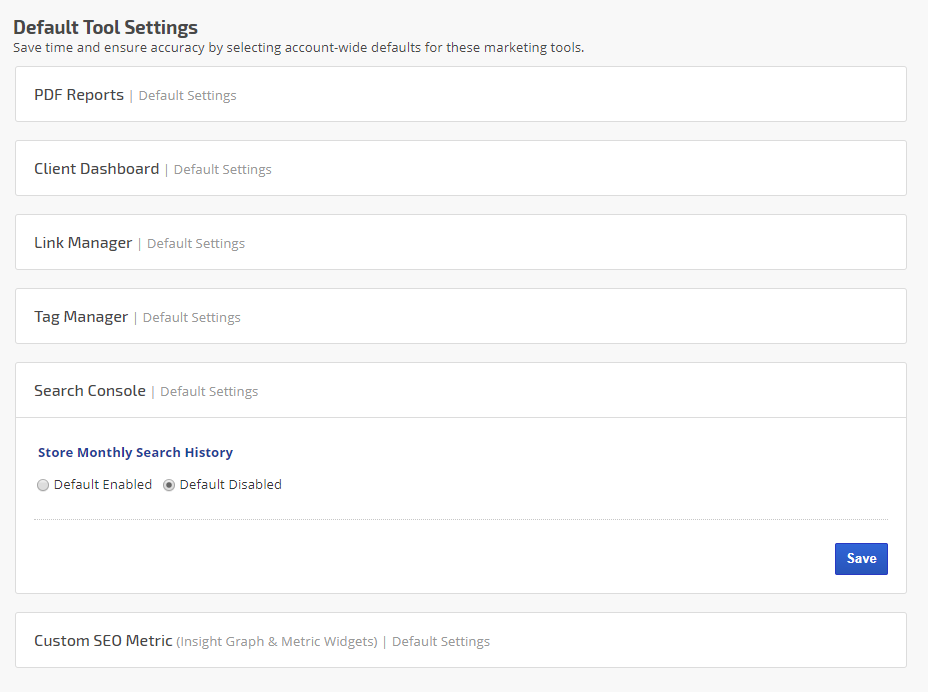
In each campaign's Webmaster Tools setting screen, you can enable the Historical Data Storage option that causes the following Search Console data to be stored based on calendar months without filters:
- Daily totals for Clicks, Impressions, CTR and Position
- Unfiltered Keyword totals for up to 5000 queries
- Unfiltered Landing Page totals for up to 5000 pages
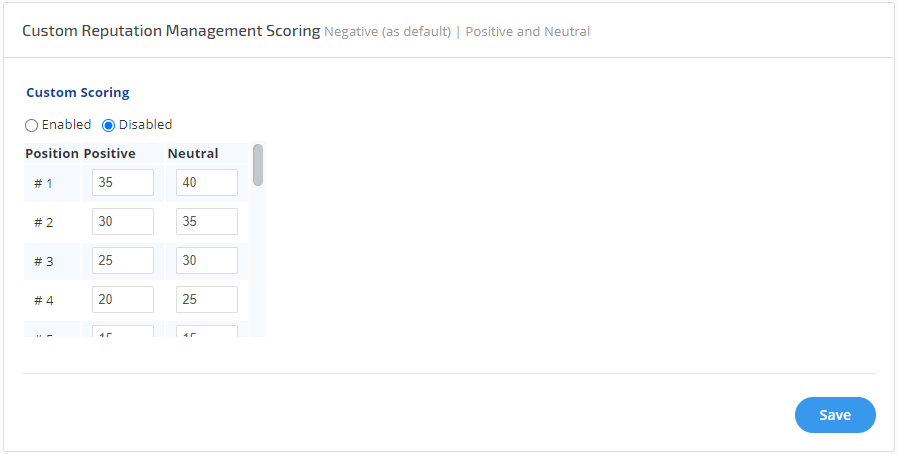
Custom Reputation Management Score Account Default Settings
Create your own custom Reputation Management Score for the Reputation Management Overview by Enabling the custom scoring and by specifying the core for each position for the Positive and Neutral results.
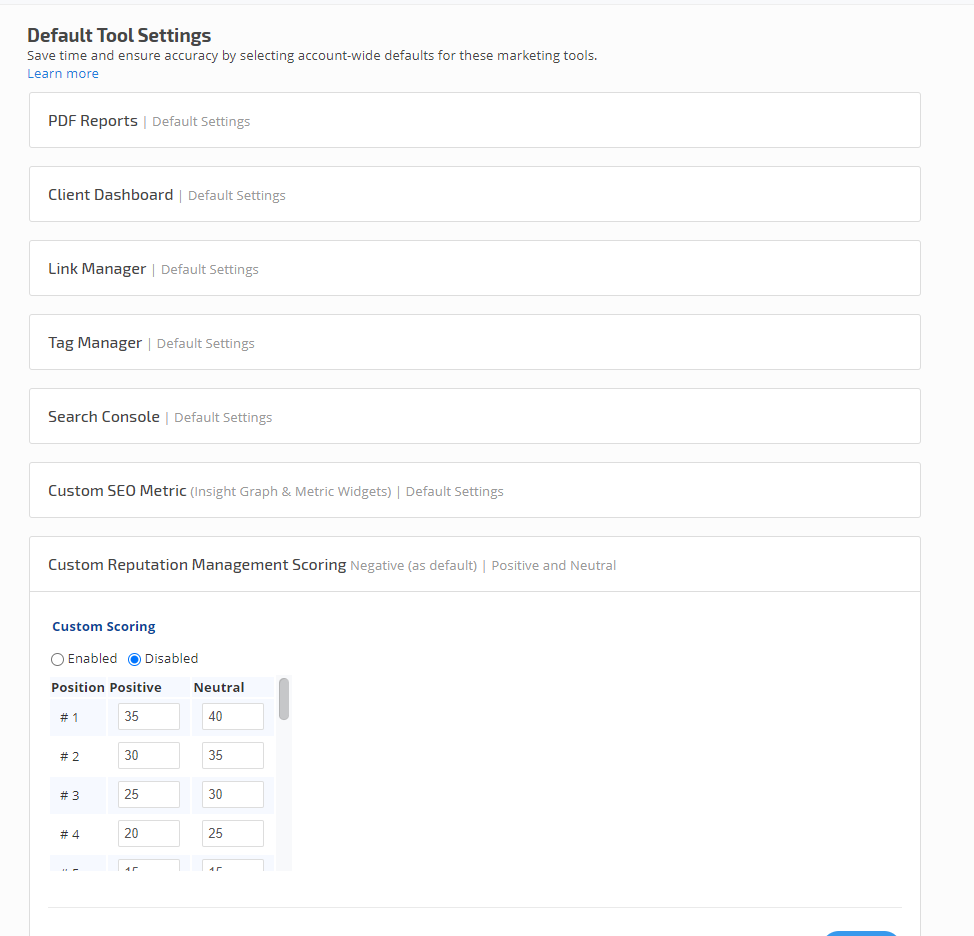
Custom Reputation Management Score
This tool allows you to set the value of score calculation for each rank in positions 1 through 20 for Positive and/Neutral results.
This tool allows you to set the value of score calculation for each rank in positions 1 through 20 for Positive and/Neutral results.
- Enable the Custom Scoring
- Specify your scores for positions 1-10 or 1-20. By default, all values for positions 11-20 have a value of 0.
- Click the Save button
When Custom Score is enabled then the calculation is done based on the values specified. Please make sure you specify the correct values that represent the score for each Positive and Negative result position.
Below is an example of the values that can be assigned:
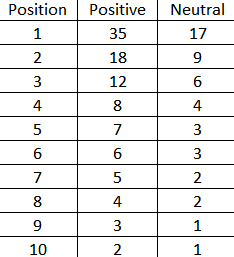
Once all is set click Save
How it works:
For example, the 1st position result is Positive, then the value for the score accumulation will be 35. Then the 2nd position result is Neutral then the value 9 is used for the score accumulations. Then the 3rd position result is negative the value 0 is used and so on.
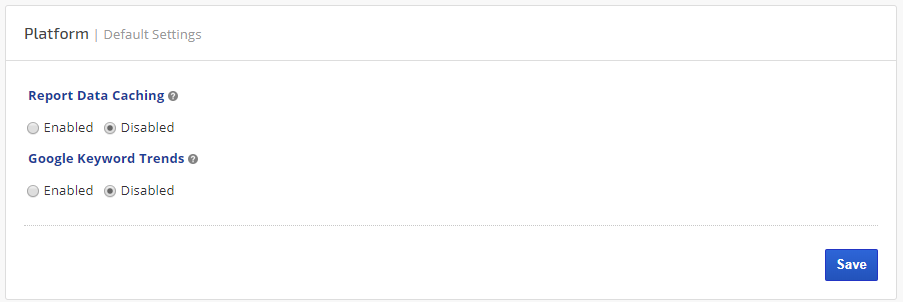
Platform Default Settings
The Platform default settings include Report Data Caching and Google Keyword Trends. (Only the passed months data is cached.)
Report Data Caching
When set to Enabled, the Report Data Caching applies to:
Google Keyword Trends
Google Trends provides access to a largely unfiltered sample of actual search requests made to Google (learn more). Enabling this option account-wide provides each campaign with access to our Keyword Trends report. When set to Enabled, Google Trends data will be refreshed between the 3rd and 5th day of each month for the previous month.
Enable or Disable Options
Select the Enabled or Disabled option for each item for account-wide deployment
Report Data Caching
When set to Enabled, the Report Data Caching applies to:
- The Organic Page Count widget that can display in Rank Dashboard or Classic Widgets.
- The baseline of rank data when baseline or overall performance change values are selected in rank reports (e.g., Rank Tracker Dashboard, Overall Ranking Performance, Enterprise Portfolio reports and more)
- The Marketing Dashboard cache function (if a dashboard has that option enabled)
Google Keyword Trends
Google Trends provides access to a largely unfiltered sample of actual search requests made to Google (learn more). Enabling this option account-wide provides each campaign with access to our Keyword Trends report. When set to Enabled, Google Trends data will be refreshed between the 3rd and 5th day of each month for the previous month.
Enable or Disable Options
Select the Enabled or Disabled option for each item for account-wide deployment