Connecting a rank tracking campaign to Google Drive allows you to use external data in the Insight Graph, export rank reports directly to a Rank Ranger campaign folder in your Drive, and store documents relating to specific Links in Link Manager.
File size and type are based on Google Drive restrictions.
For more information regarding adding, managing, and deleting 3rd party integrations, please refer to our Authorize Connections documentation.
- SEO
- Rank Tracker
- Local SEO
- Mobile SEO
- Link Manager
- Landing Pages
- Social Signals
- On-Page Optimization
- Enterprise SEO Solutions
- Marketing
- Competition Analysis
- Insight Graph
- Keyword Research
- Graphs & Widgets
- Market Reach
- Marketing KPI
- Brand Visibility
- White Label SEO
- Marketing Dashboard
- Client Dashboard
- PDF Reports
- PDF Templates
- Other
- Email Notifications
- Portfolio Management
- Integrations
- Google Analytics
- Search Console
- Pay Per Click
- WeDevelop
- API
Google Drive
Integrate Google Drive with Rank Ranger
- Log into a Google account (e.g., Gmail, Google Plus, etc.) for the Drive account you want to integrate with Rank Ranger.
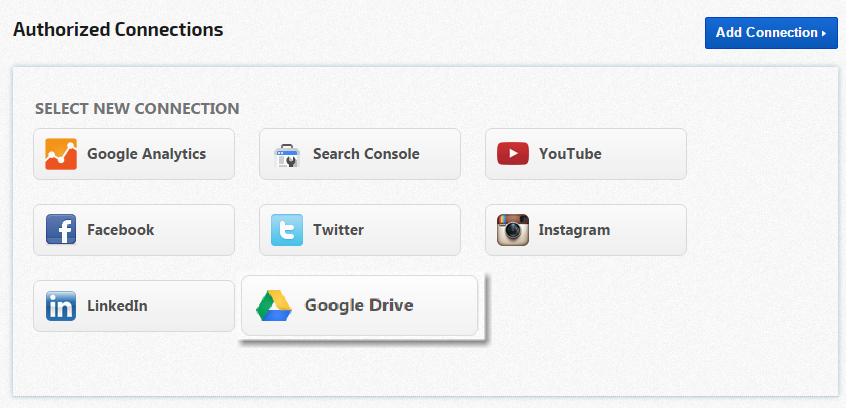
- Open the Account Settings > Authorized Connections screen.
- Click the Add Connection button to expand the option list.
- Click the Google Drive button.
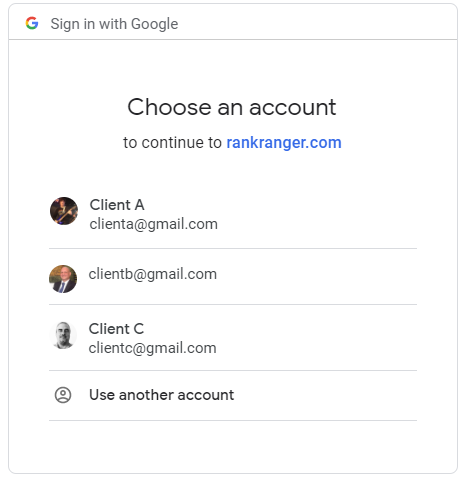
Select the Account
If more than one Google account is accessed with the computer or device you're using, then Google will ask you to choose an account.
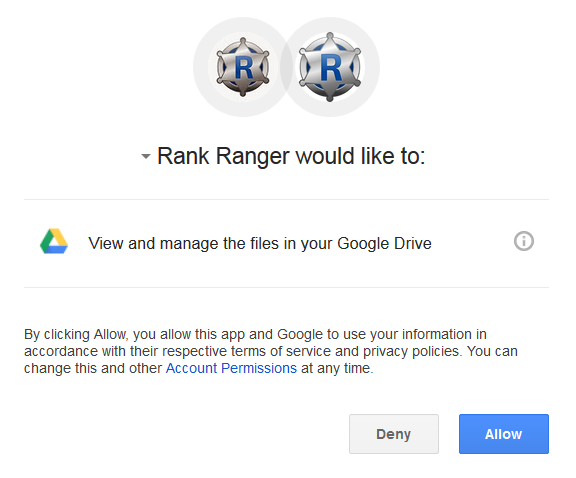
Permissions
Rank Ranger requires access to view and manage files in your Google Drive in order to complete this integration. This involves the creation of folders that contain Rank data files and any files you upload to Link Manager (more information about this use can be found in the Rank Data and Link Manager sections in this document).
Review the permissions that need to be granted and click the Allow button if you agree.
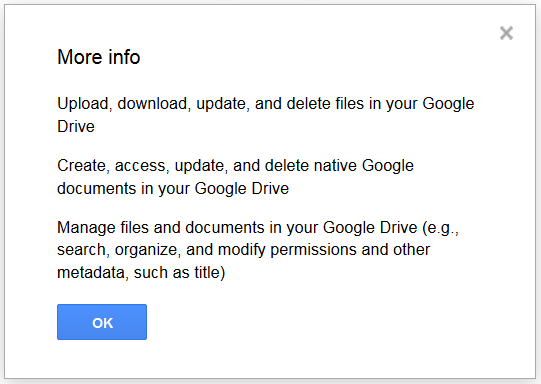
More info
Click the i icon to review more information regarding the account permissions. Click the OK button to close the window.
Click the i icon to review more information regarding the account permissions. Click the OK button to close the window.
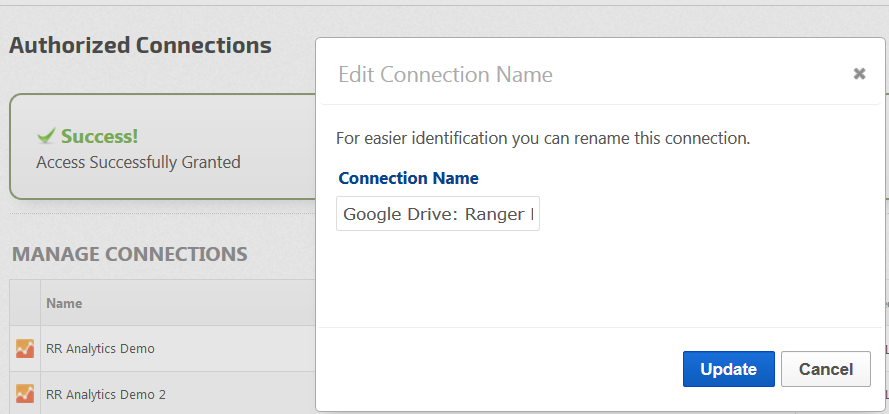
Name the Connection
Rank Ranger default is to name the connection based on the type (e.g., Google Drive) followed by the account name. You have the option to change that connection name during creation by entering the desired name in the Connection Name field and clicking the Update button. The name can also be edited later (refer to instructions in Authorize Connections).
Rank Ranger default is to name the connection based on the type (e.g., Google Drive) followed by the account name. You have the option to change that connection name during creation by entering the desired name in the Connection Name field and clicking the Update button. The name can also be edited later (refer to instructions in Authorize Connections).
Integrate Campaign with Google Drive
Connecting a rank tracking campaign to Google Drive will allow you to export Rank Tracker Dashboard reports directly to a Rank Ranger campaign folder in your Drive, and use data that you have in a Google Sheet in our Insight Graphs and Metric Widgets.

Connecting a rank tracking campaign to Google Drive will allow you to export Rank Tracker Dashboard reports directly to a Rank Ranger campaign folder in your Drive, and use data that you have in a Google Sheet in our Insight Graphs and Metric Widgets.
- After connecting a Google Drive account to your Rank Ranger account, open the Campaign Settings > Other Integrations screen
- Scroll down the Google Drive section and select a connection from the list of Google Drive accounts authorized for use in your Rank Ranger account.
- Click the Connect button.
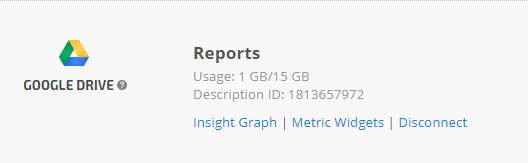
Campaign Connected to Google Drive
It is important to click the Connect button after selecting the Drive account. When the Drive is correctly connected, Rank Ranger displays the Drive account name and usage. To disconnect a Drive account from a campaign, simply click the Disconnect link below the Drive account information on the Campaign Settings > General Settings screen.
Google Sheets Data in Insight Graph
Integrate Google Sheets data with marketing metrics in an Insight Graph
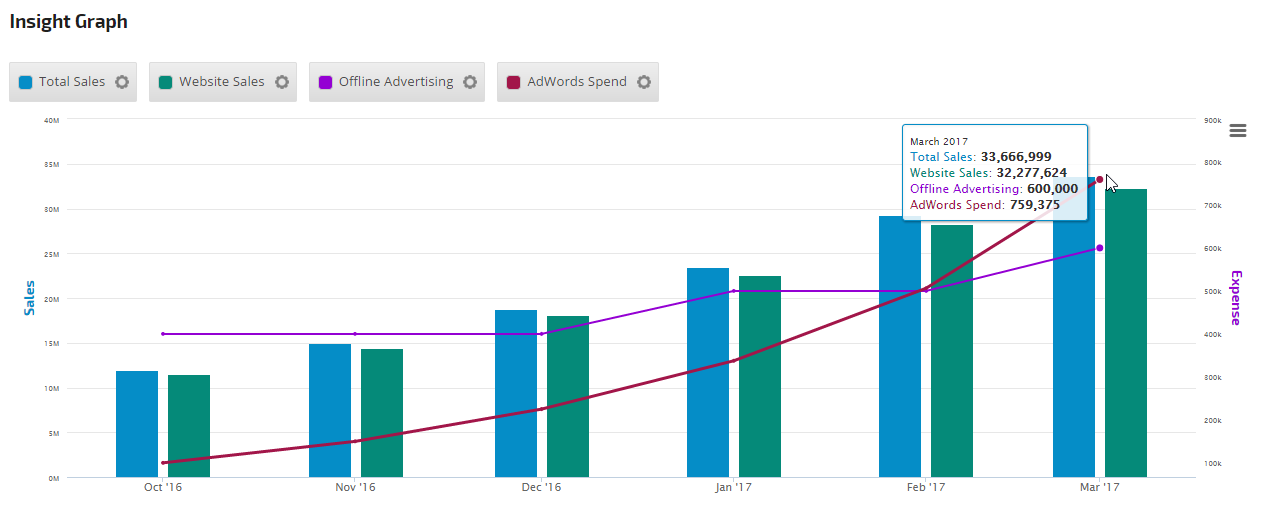
Google Sheets integration makes it possible for you to produce a graph with internal company data (e.g., sales, offline advertising, net profit, etc.) that is not available via third-party integration. That data can easily be blended in a graph with our search engine rank and backlink data, search traffic, social media and email campaign performance, and more.
In this example, we've used Google Sheet data for the Total Sales and Offline Advertising expense, and added Website Sales (from Google Analytics tracking) and AdWords Spend per month (AdWords must be linked to your Google Analytics profile - refer to Link Google Analytics and AdWords).
The first step to graphing data from Google Sheets is to authorize a Google Drive account and connect it to a campaign.
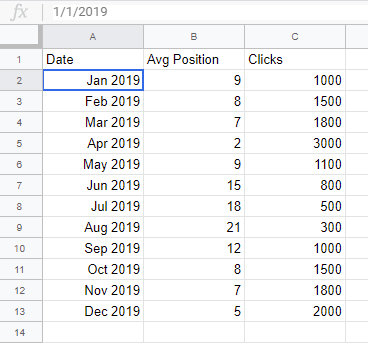
Important! Dates must be entered in the Google Sheet as numbers only (e.g., MM/DD/YYYY) regardless of the display format when viewing Google Sheets. In the above screenshot, Jan 2019 is displaying, but if you look in the fx cell the date is 1/1/2019.
Value Type: select Decimal or Integer
In this example, the settings are reversed
In this example, the Avg Pos metric is displayed as a line with Y-Axis in Descending order and Clicks are set to Y-Axis Ascending order.
Refer to Metric Display Settings to learn more about colors, chart types, markers, labels and date options.
Google Sheets integration makes it possible for you to produce a graph with internal company data (e.g., sales, offline advertising, net profit, etc.) that is not available via third-party integration. That data can easily be blended in a graph with our search engine rank and backlink data, search traffic, social media and email campaign performance, and more.
In this example, we've used Google Sheet data for the Total Sales and Offline Advertising expense, and added Website Sales (from Google Analytics tracking) and AdWords Spend per month (AdWords must be linked to your Google Analytics profile - refer to Link Google Analytics and AdWords).
Insight Graph displaying data from Google Sheets, Analytics and AdWords
The first step to graphing data from Google Sheets is to authorize a Google Drive account and connect it to a campaign.
Add Google Sheets Metric
Open an Insight Graph or Metric Widget and select:
Open an Insight Graph or Metric Widget and select:
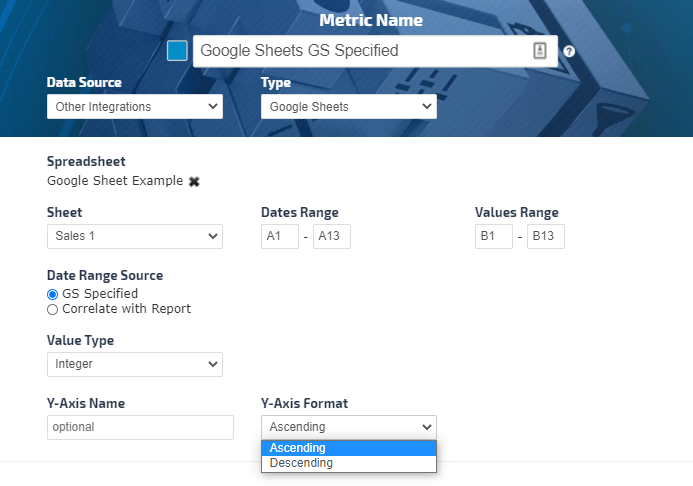
- Data Source: Other Integrations
- Type: Google Sheets
Define the Metric Data
Select the Sheet name from the menu (each tab in Google Sheets has a label name, e.g., Sheet1, Sheet 2, or user assigned custom names)
Select the Sheet name from the menu (each tab in Google Sheets has a label name, e.g., Sheet1, Sheet 2, or user assigned custom names)
There are two options on how the data to be retrieved from the Google Sheet depending on the Data Range Source selection:
- GS Specified (Google Sheet Specified - where the only the cells range specified for Dates Range and Values Range from the Google Sheet to be displayed in the Insight Graph.)
- Dates Range - Enter the start cell and end cell that contain the dates
- Values Range - Enter the start cell and end cell that contain the values
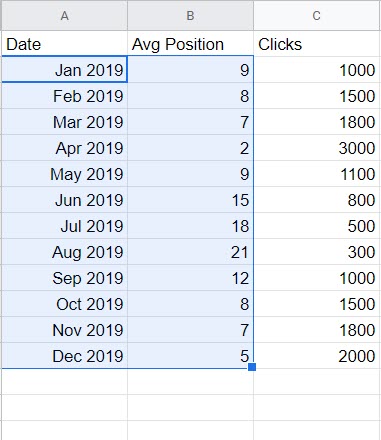
- Correlated with Report (The dates are matched to the Insight Graph Date Range selected in the report and the data dynamically changes when the report data range is changed.)
- Dates Range - Recommended to specify the column of the dates in order to capture the future populated dates, for example A for the start and A for the end date
- Values Range - Recommended to specify the column of the values in order to capture the future populated values, for example B for the start and B for the end values
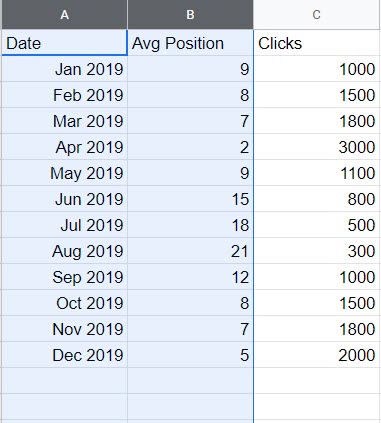
Important! Dates must be entered in the Google Sheet as numbers only (e.g., MM/DD/YYYY) regardless of the display format when viewing Google Sheets. In the above screenshot, Jan 2019 is displaying, but if you look in the fx cell the date is 1/1/2019.
Value Type: select Decimal or Integer
Y-Axis Name and Format Settings
By default each metric has its own separate Y Axis with a label matching the Metric Name field.
By default each metric has its own separate Y Axis with a label matching the Metric Name field.
- If you want the Y Axis name to be different than the metric name, you can enter the label in the Y Axis name field.
- If you want a group of metrics all plotted on the same Y axis, then enter the same Y Axis name when adding each metric.
- You can set the Y-Axis data to display in ascending or descending order.
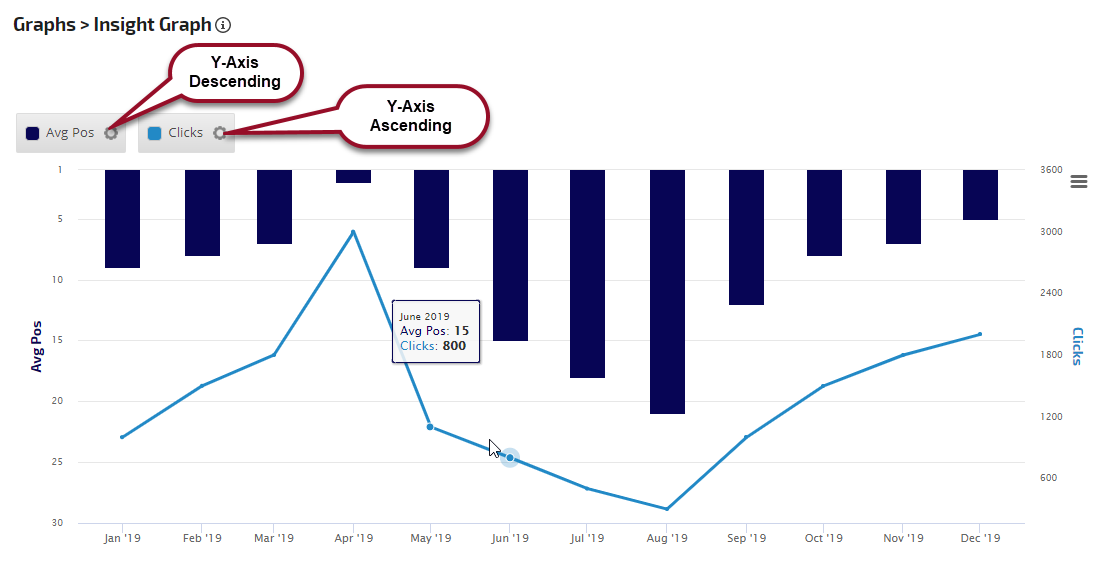
Y-Axis Format Examples
In this example, the Avg Pos metric has a Y-Axis setting of Ascending, and the Clicks metric's Y-Axis is set to Descending to make a visual correlation between the average position and number of clicks.
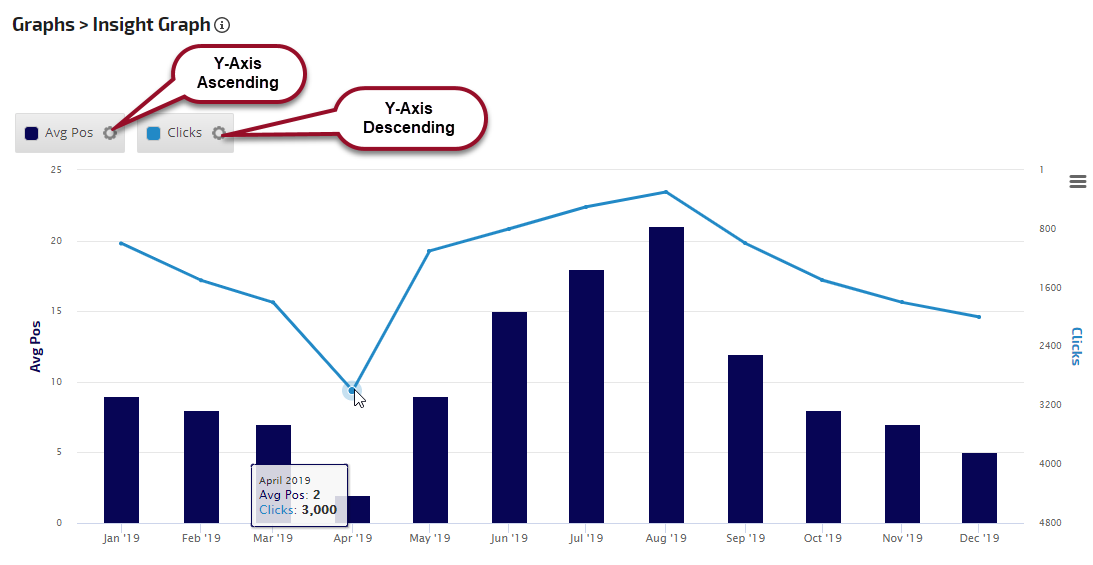
In this example, the Avg Pos metric has a Y-Axis setting of Ascending, and the Clicks metric's Y-Axis is set to Descending to make a visual correlation between the average position and number of clicks.
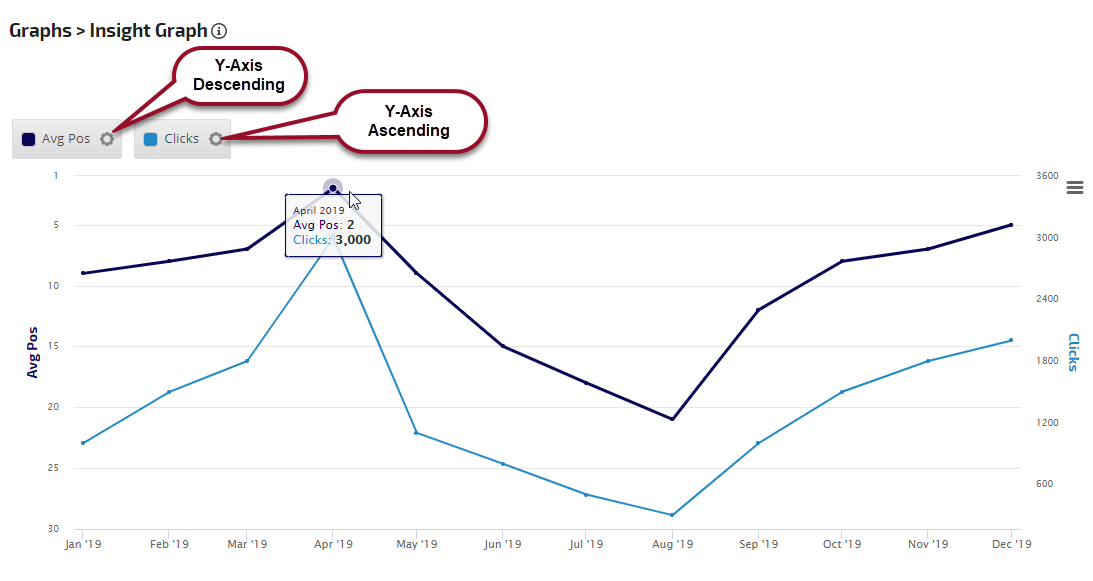
In this example, the settings are reversed
In this example, the Avg Pos metric is displayed as a line with Y-Axis in Descending order and Clicks are set to Y-Axis Ascending order.
Insight Graph with Shared Y-Axis
In this example, "Percent" was entered in the Y Axis name field of all 4 metrics to cause them all to be graphed on the same scale.
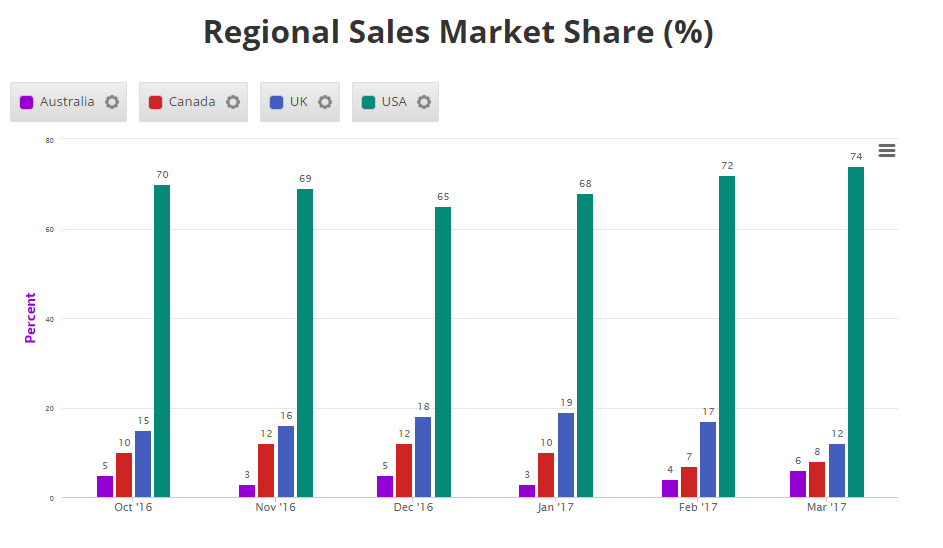
In this example, "Percent" was entered in the Y Axis name field of all 4 metrics to cause them all to be graphed on the same scale.
Refer to Metric Display Settings to learn more about colors, chart types, markers, labels and date options.
Troubleshooting Google Sheets data in an Insight Graph
If the Google Sheet data does not appear on the screen at all:
If the Google Sheet data does not appear on the screen at all:
- Confirm that the campaign is connected the Google Drive account that the Sheet is located in.
- Confirm that the connected Google account has not exceeded Google's Service Quota. Every time you or anyone you've shared online reports with loads or refreshes a screen, the data is called from Google's API. Therefore, we recommend only using Google Sheets for data that is not available in Rank Ranger via the variety of integrations that we offer.
- If you see a 0 or a flat line at the 0 position for dates that do have data in your Google Sheet, that means that the selected range of values in the metric is incorrect and you need to replace it with the correct column and row references.
- If the Google Sheet that you originally referenced in a metric has been modified in such a way that row numbers or column letters changed, then you need to update each metric previously added in Rank Ranger to match the new data structure (e.g., if you referenced data in Value Range B1:B12 and then inserted a column to the left of column B that changes it to column C, then you need to change the Value Range to C1:C12 in your Rank Ranger metrics).
- Share that Google Sheet with service@rankranger.com and
- Send an email to service@rankranger.com with the campaign name and Insight Graph location, for example:
- Campaign Insight Graph report screen
- Marketing Dashboard, along with page name and Insight Graph custom title
- Client Dashboard
- PDF Report name, along with Insight Graph custom title
- Include screenshots or video of a specific behavior you experienced, if possible
Google Sheets Data in Metric Widgets
Integrate Google Sheets data with marketing metrics in single or multiple Metric Widgets
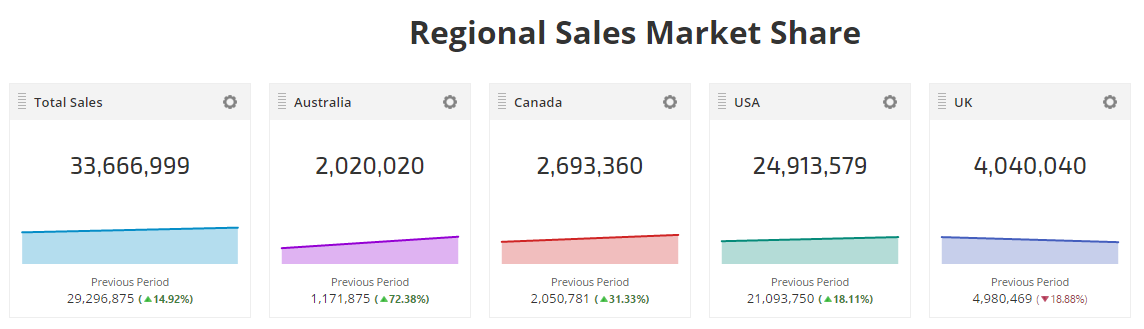
In this example, we've used Google Sheet data for the total sales vs. sales per region compared to previous period.
Series of Metric Widgets
The first step to creating widgets using data from a Google Sheet is to authorize a Google Drive account and connect it to a campaign.
Add Google Sheets Metric
Open Reports & Tools > Custom Suite > Metric Widget, click the Add New Metric button and select:
Select the Sheet name from the menu (each tab in Google Sheets has a label name, e.g., Sheet1, Sheet 2, or user assigned custom names).
There are two options on how the data to be retrieved from the Google Sheet depending on the Data Range Source selection:
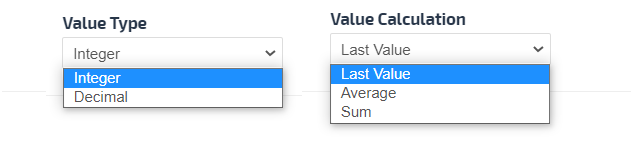
By default Value Type is set to be an integer and there is an option to display the decimal points.
The Value Calculation is set to be Last Value in the specified Values Range. The additional options are to calculate the Average and Sum of the specified Values Range.
Important! Dates must be entered in the Google Sheet as numbers only (e.g., MM/DD/YYYY) regardless of the display format when viewing Google Sheets.
Example of Google Sheet Specified Data Range Source
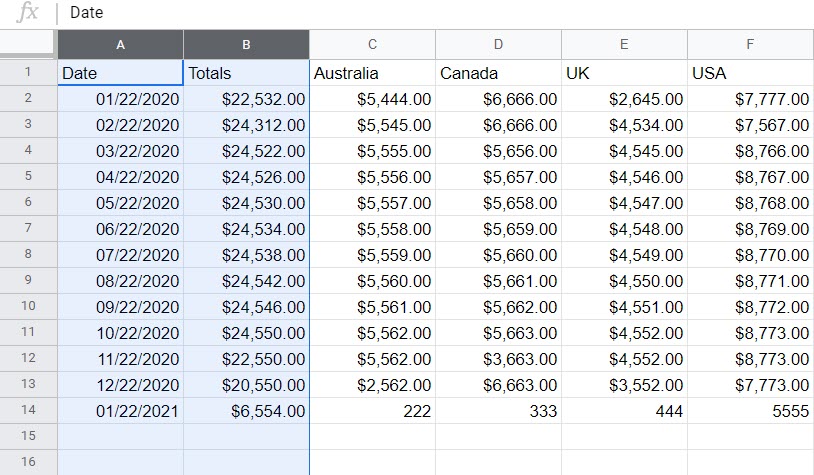
Using the following Google Sheet example, the Metric settings in the previous image correspond to a Date Range from cells A2 - A3; February - March 2017, and Regional Sales for Australia from cells C2 - C3. By default latest date in the series entered determines the current data unless Value Calculation is defined as an Average or a Sum.
Previous Period need to be switched on and the Sheet name, Compare to Date and Compare to Value Ranges have to be specified.
Google Sheet document can be all in one Sheet or you can use different Sheets.

Refer to Metric Display Settings to learn more about color and theme options.
Troubleshooting Google Sheets data in Metric Widgets
If the Google Sheet data does not appear on the screen at all:
The first step to creating widgets using data from a Google Sheet is to authorize a Google Drive account and connect it to a campaign.
Add Google Sheets Metric
Open Reports & Tools > Custom Suite > Metric Widget, click the Add New Metric button and select:
- Data Source: Other Integrations
- Type: Google Sheets In the Spreadsheet field, copy and paste the URL of the Google Sheet containing the data
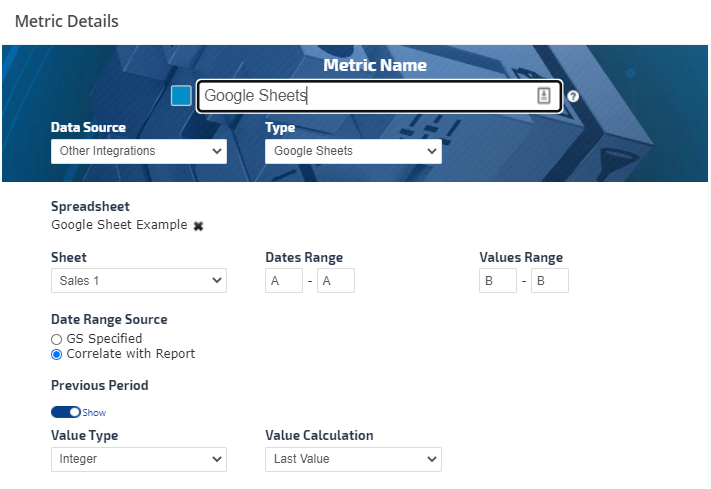
Select the Sheet name from the menu (each tab in Google Sheets has a label name, e.g., Sheet1, Sheet 2, or user assigned custom names).
There are two options on how the data to be retrieved from the Google Sheet depending on the Data Range Source selection:
- GS Specified (Google Sheet Specified - where the exact cell location from the Google Sheet to be specified for the Dates Range and Values Range of the current and Previous Period)
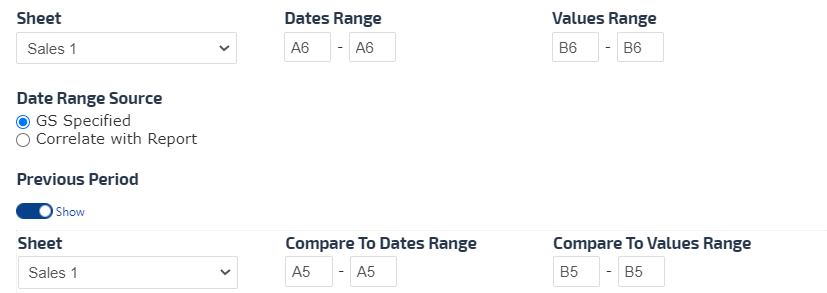
- Dates Range - Enter the start cell and end cell that contain the dates, for example for current A6-A9 and for the Previous Period A2-A5 or just one cell as an example in the image below.
- Values Range - Enter the start cell and end cell that contain the values, for example for current B6-B9 and for the Previous Period B2-B5 or just one cell as an example in the image below.
- Correlated with Report (The dates are matched to the Metric Widget Date Range selected in the report and data dynamically changes when the report data range is changed. Previous Period Date and Value Ranges are not available because they will be automatically retrieved based on the report date range specified).
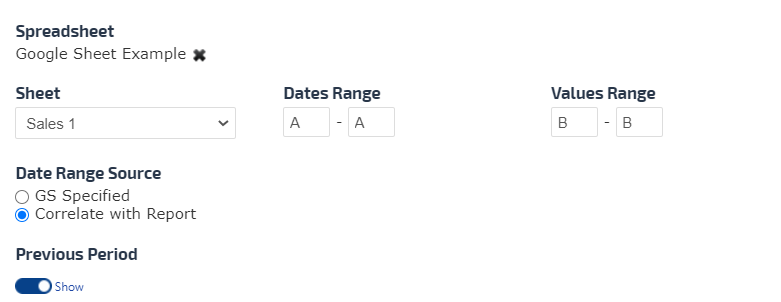
Note: The Correlated with Report Data Source allows the Marketing Dashboard Metric Widget to change when the months change.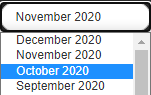
- Dates Range - The recommended selection should be a letter of the column for both start and end cell in order to capture the future populated dates, for example A
- Values Range - The recommended selection should be a letter of the column for both start and end cell in order to capture the future populated values, for example B
By default Value Type is set to be an integer and there is an option to display the decimal points.
The Value Calculation is set to be Last Value in the specified Values Range. The additional options are to calculate the Average and Sum of the specified Values Range.
Important! Dates must be entered in the Google Sheet as numbers only (e.g., MM/DD/YYYY) regardless of the display format when viewing Google Sheets.
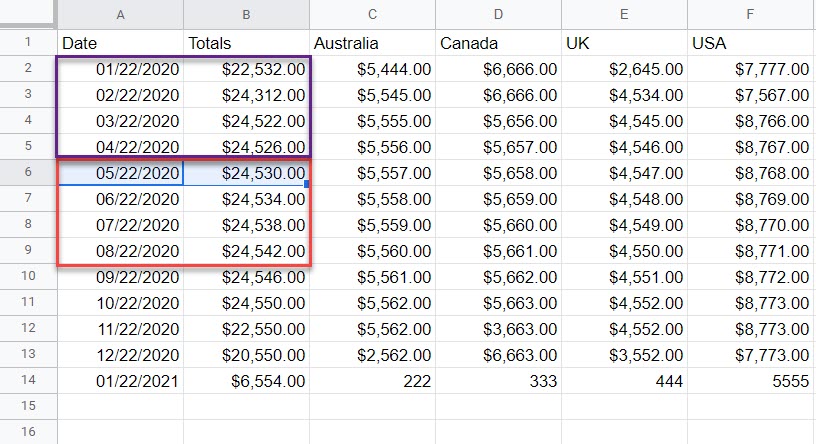
Example of Google Sheet Specified Data Range Source
Using the following Google Sheet example, the Metric settings in the previous image correspond to a Date Range from cells A2 - A3; February - March 2017, and Regional Sales for Australia from cells C2 - C3. By default latest date in the series entered determines the current data unless Value Calculation is defined as an Average or a Sum.
Previous Period need to be switched on and the Sheet name, Compare to Date and Compare to Value Ranges have to be specified.
Google Sheet document can be all in one Sheet or you can use different Sheets.
Refer to Metric Display Settings to learn more about color and theme options.
Troubleshooting Google Sheets data in Metric Widgets
If the Google Sheet data does not appear on the screen at all:
- Confirm that the campaign is connected the Google Drive account that the Sheet is located in.
- Confirm that the connected Google account has not exceeded Google's Service Quota. Every time you or anyone you've shared online reports with loads or refreshes a screen, the data is called from Google's API. Therefore, we recommend only using Google Sheets for data that is not available in Rank Ranger via the variety of integrations that we offer.
- If you see a 0 or a flat line at the 0 position for dates that do have data in your Google Sheet, that means that the selected range of values in the metric is incorrect and you need to replace it with the correct column and row references.
- If the Google Sheet that you originally referenced in a metric has been modified in such a way that row numbers or column letters changed, then you need to update each metric previously added in Rank Ranger to match the new data structure (e.g., if you referenced data in Value Range B1:B12 and then inserted a column to the left of column B that changes it to column C, then you need to change the Value Range to C1:C12 in your Rank Ranger metrics).
- Share that Google Sheet with service@rankranger.com and
- Send an email to service@rankranger.com with the campaign name and Metric Widget location, for example:
- Campaign Single Metric Widgets report screen
- Marketing Dashboard, along with page name and Metric Widget custom title
- Client Dashboard
- PDF Report name, along with Metric Widget custom title
- Include screenshots or video of a specific behavior you experienced, if possible
Rank Data Export to Google Drive
Export Rank Tracking Report to Google Drive
To utilize the export to Google Drive feature, you must be logged into the Google account for the Drive that is connected to the campaign (learn how to authorize connection to Google Drive and connect Google Drive to a campaign).
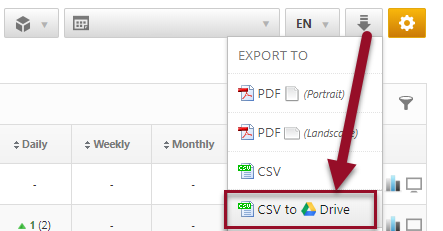
In the Rank Tracker Dashboard report, hover over the download icon and select CSV to Drive.
To utilize the export to Google Drive feature, you must be logged into the Google account for the Drive that is connected to the campaign (learn how to authorize connection to Google Drive and connect Google Drive to a campaign).
In the Rank Tracker Dashboard report, hover over the download icon and select CSV to Drive.
Rank Report Export Successful
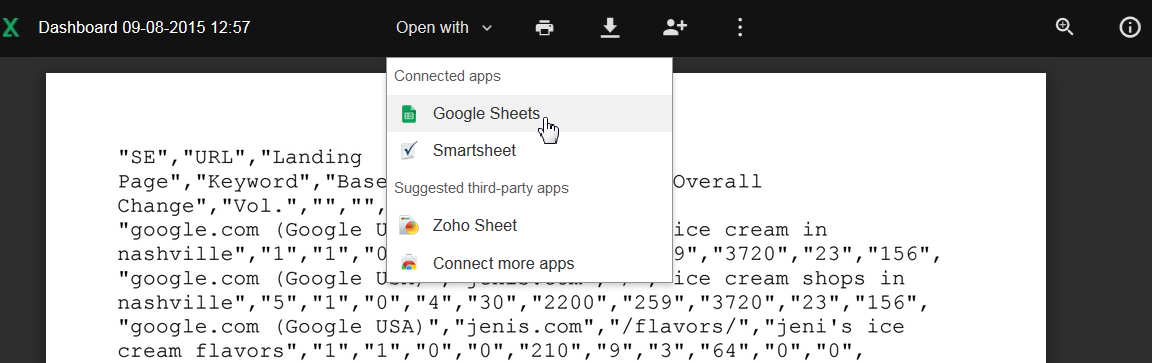
The exported file displays in the browser and can be opened with a variety of tools or closed and viewed later.
The exported file displays in the browser and can be opened with a variety of tools or closed and viewed later.
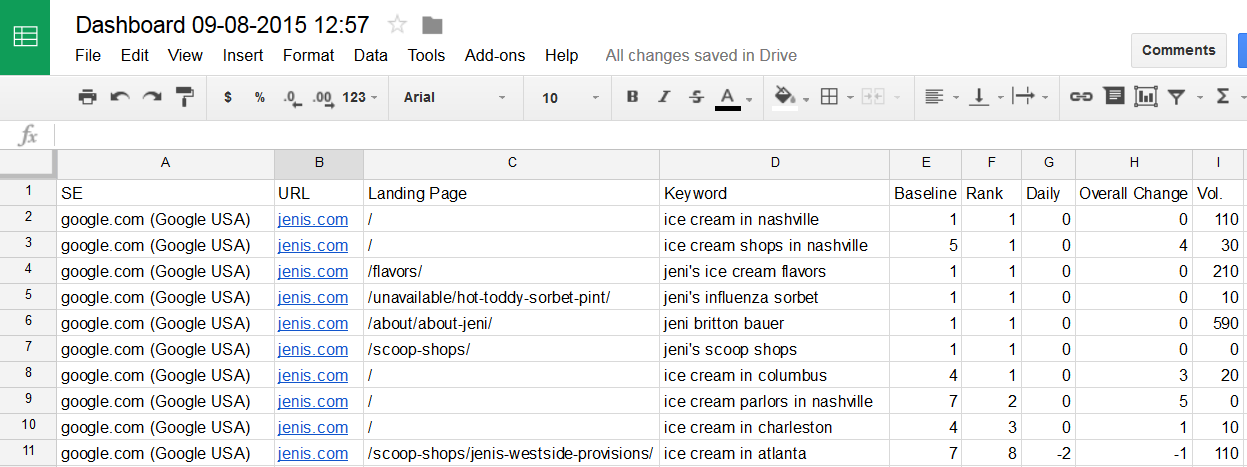
View Rank Report in Google Sheets
In the above example, I chose to open the rank report data in Google Sheets and am now able to work with that data as needed.
In the above example, I chose to open the rank report data in Google Sheets and am now able to work with that data as needed.
View Rank Ranger Campaign Data in Google Drive
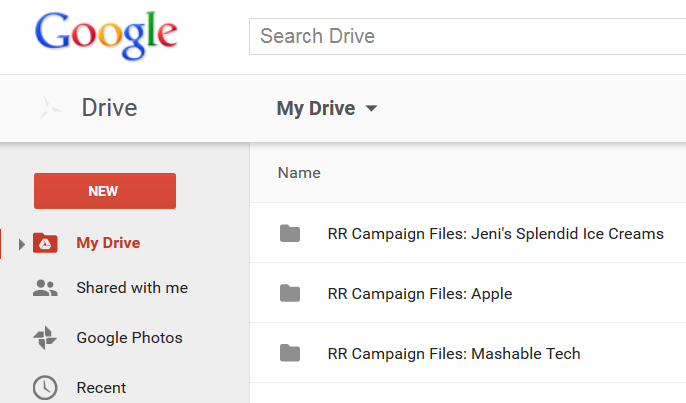
After exporting a report from Rank Ranger to Google Drive, you will see a folder for each campaign in that Drive. You can rename those folders and move them to other locations within that same Drive and Rank Ranger will continue to write to that folder when you export additional reports for that same campaign as long as authorized access exists in your Account & Campaign Settings for that Drive. These folders can be shared with others in the same manner you share any folder in Google Drive.
After exporting a report from Rank Ranger to Google Drive, you will see a folder for each campaign in that Drive. You can rename those folders and move them to other locations within that same Drive and Rank Ranger will continue to write to that folder when you export additional reports for that same campaign as long as authorized access exists in your Account & Campaign Settings for that Drive. These folders can be shared with others in the same manner you share any folder in Google Drive.
Rank Data Files in Google Drive for 1 Campaign
In this example you see the Jeni's Splendid Ice Creams campaign with 3 files; 2 CSV files of the Dashboard report for each reflecting a different date, and 1 Google Sheet file for the date that I opened and edited the CSV file data using Google Sheets. Like all Google Drive files, these files can be shared with others and downloaded to a local computer drive.

In this example you see the Jeni's Splendid Ice Creams campaign with 3 files; 2 CSV files of the Dashboard report for each reflecting a different date, and 1 Google Sheet file for the date that I opened and edited the CSV file data using Google Sheets. Like all Google Drive files, these files can be shared with others and downloaded to a local computer drive.
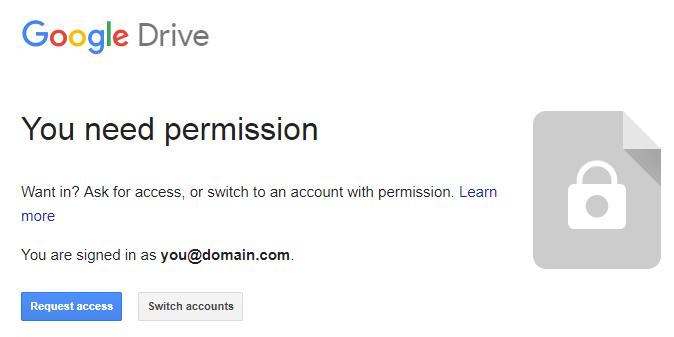
Google Drive Error
If after clicking the CSV to Drive option, you recieve an error message from Google indicating that you need permission, that indicates that you are not logged into the Google Drive account that is connected to the campaign. You may choose one of two methods to resolve this error:
- Click the Switch accounts button and select and log into the Google account that is connected to the campaign
- Change the Google Drive account that is connected to the campaign in the Campaign Settings > Other Integrations screen, to the Google account that you are logged into while working in Rank Ranger.
Link Manager File Storage in Google Drive
Connect Google Drive with Link Manager for Link-related Documents
Connecting a Google Drive to your Link Manager will allow you to attach files (e.g., invoices, link exchange agreements, etc.) to individual Link records.
Connecting a Google Drive to your Link Manager will allow you to attach files (e.g., invoices, link exchange agreements, etc.) to individual Link records.
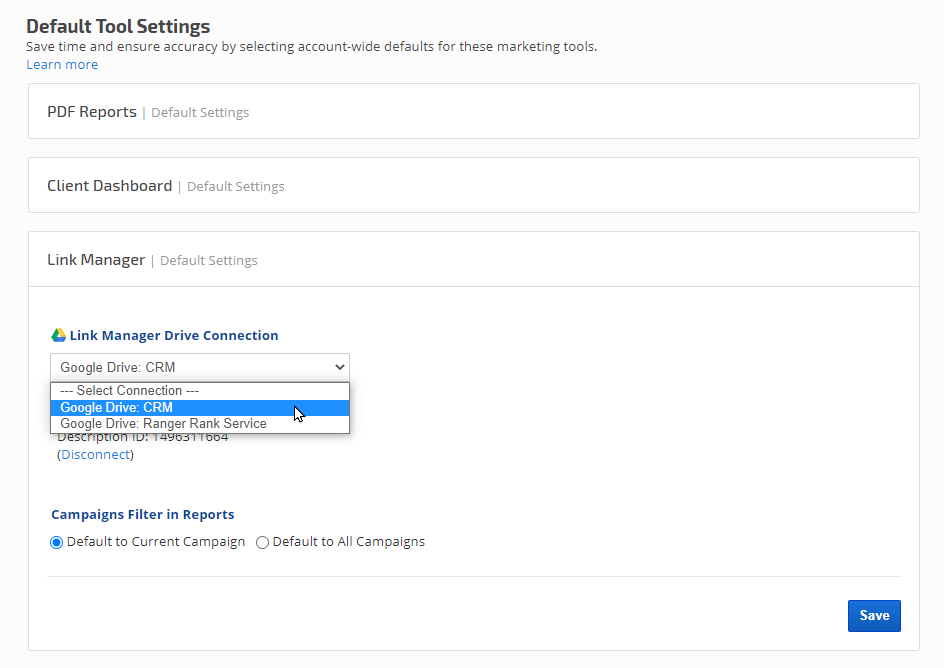
- After connecting a Google Drive account to your Rank Ranger account, open the Account Settings > Default Tool Settings screen
- Expand the Link Manager section
- Select a Drive Connection and click the Save button. When successfully connected, the Google Drive user's name and usage statistics display.
- Set either to Current Campaign or to All Campaigns (which will set a default display setting for the links in the Report Options)
Add Files to Link Details
After connecting a Google Drive to Link Manager, open the Reports > Organic Search > Link Manager > Links screen and click the Edit (pencil) icon for an individual link.

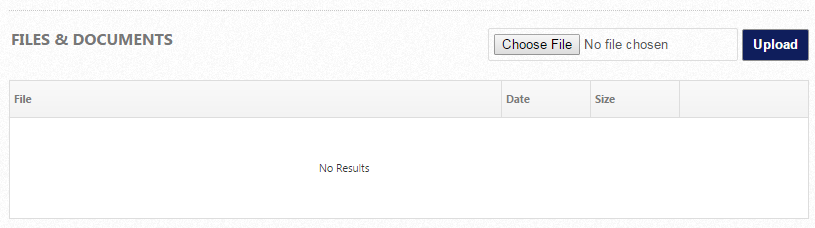
- Scroll down the screen to the Files & Documents section.
- Click the Choose File button, navigate to and select the file on your computer.
- Click the Upload button
Successful File Upload to Google Drive
When files display in the Files & Documents section of a Link Details screen, they have been successfully uploaded to the Google Drive account connected in the Localization & Settings screen. From here authorized users of the Rank Ranger account can download or delete the files.

When files display in the Files & Documents section of a Link Details screen, they have been successfully uploaded to the Google Drive account connected in the Localization & Settings screen. From here authorized users of the Rank Ranger account can download or delete the files.
Google Drive Link Manager Folders
Each individual Link is assigned an ID in the Link Manager and those IDs become the folder names in the Google Drive connected to the Rank Ranger account. Folders can be shared, renamed and moved to other locations in Google Drive as needed. Files can be deleted from the Link Details screen by an authorized user* or from Google Drive.

Each individual Link is assigned an ID in the Link Manager and those IDs become the folder names in the Google Drive connected to the Rank Ranger account. Folders can be shared, renamed and moved to other locations in Google Drive as needed. Files can be deleted from the Link Details screen by an authorized user* or from Google Drive.
*By default, a user can only manage the links s/he created unless "Manage Account Links" permission is granted by the account administrator (refer to Manage Users permissions).