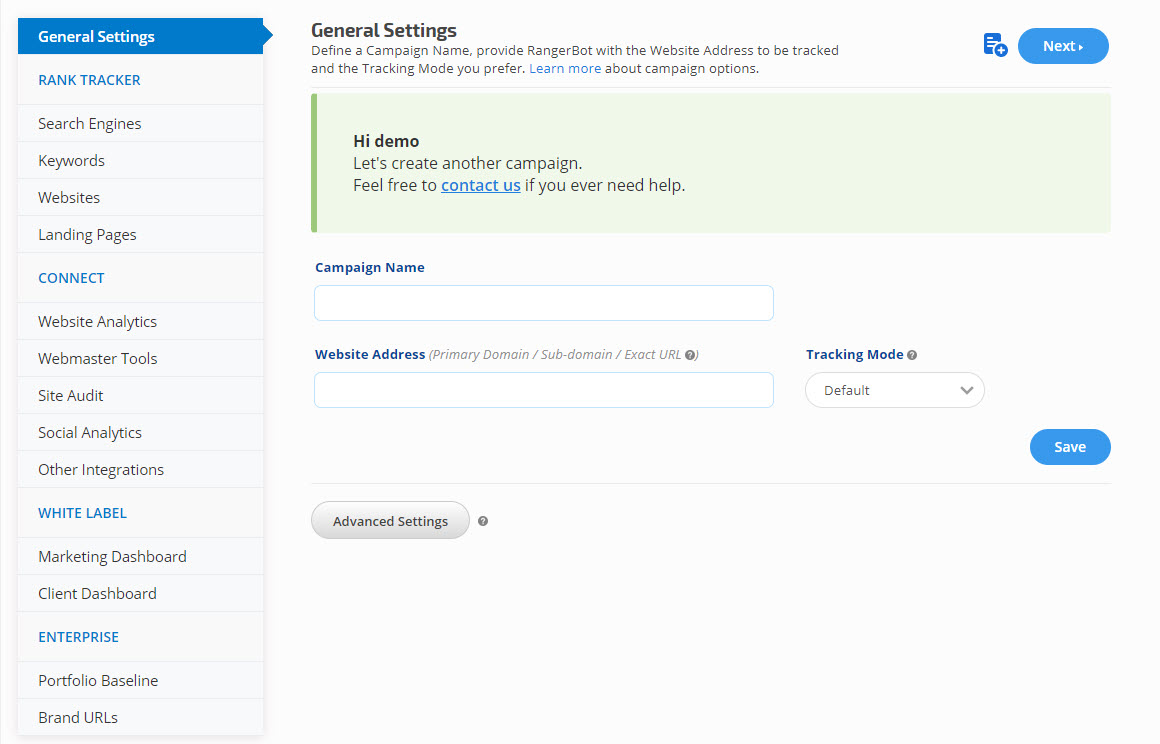
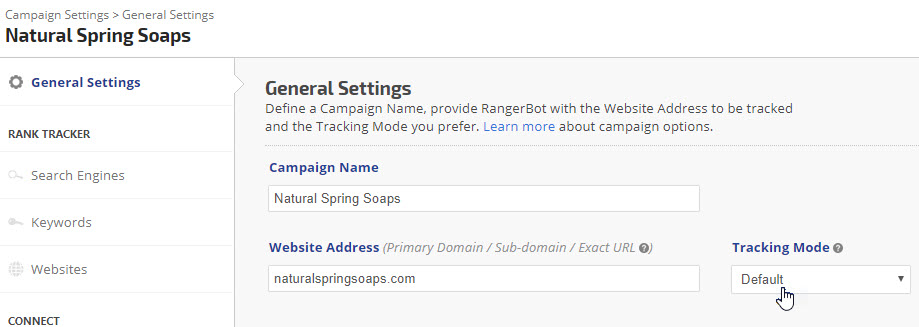
When creating a new campaign, the first screen that needs to be completed is General Settings. On this screen, you define a Campaign Name, provide RangerBot with the Website Address to be tracked and the type of Tracking Mode you prefer. Advanced Settings allow you to select a package, enter reference information, connect a Google Drive, and delete or archive a campaign.
- SEO
- Rank Tracker
- Local SEO
- Mobile SEO
- Link Manager
- Landing Pages
- Social Signals
- On-Page Optimization
- Enterprise SEO Solutions
- Marketing
- Competition Analysis
- Insight Graph
- Keyword Research
- Graphs & Widgets
- Market Reach
- Marketing KPI
- Brand Visibility
- White Label SEO
- Marketing Dashboard
- Client Dashboard
- PDF Reports
- PDF Templates
- Other
- Email Notifications
- Portfolio Management
- Integrations
- Google Analytics
- Search Console
- Pay Per Click
- WeDevelop
- API
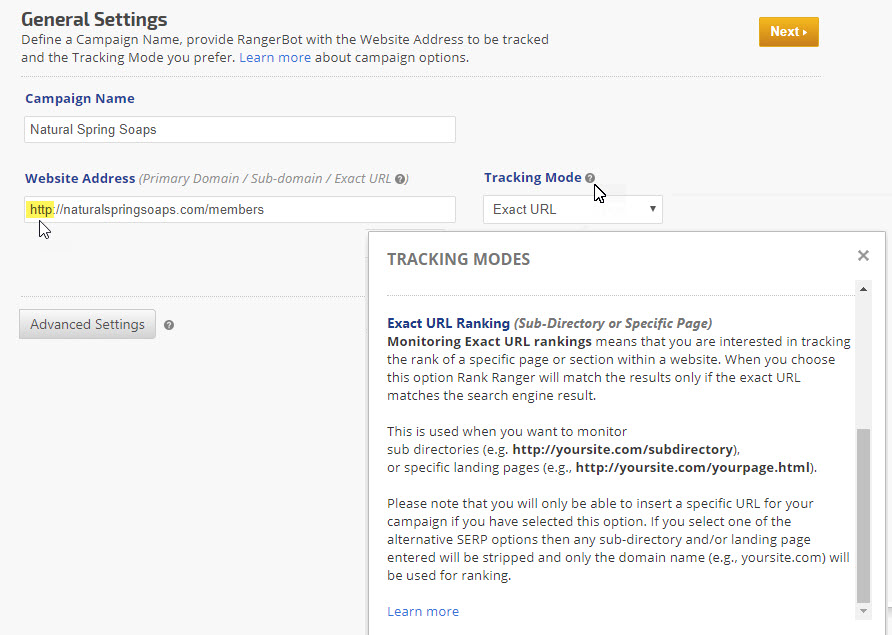
General Settings for Customizing a Campaign
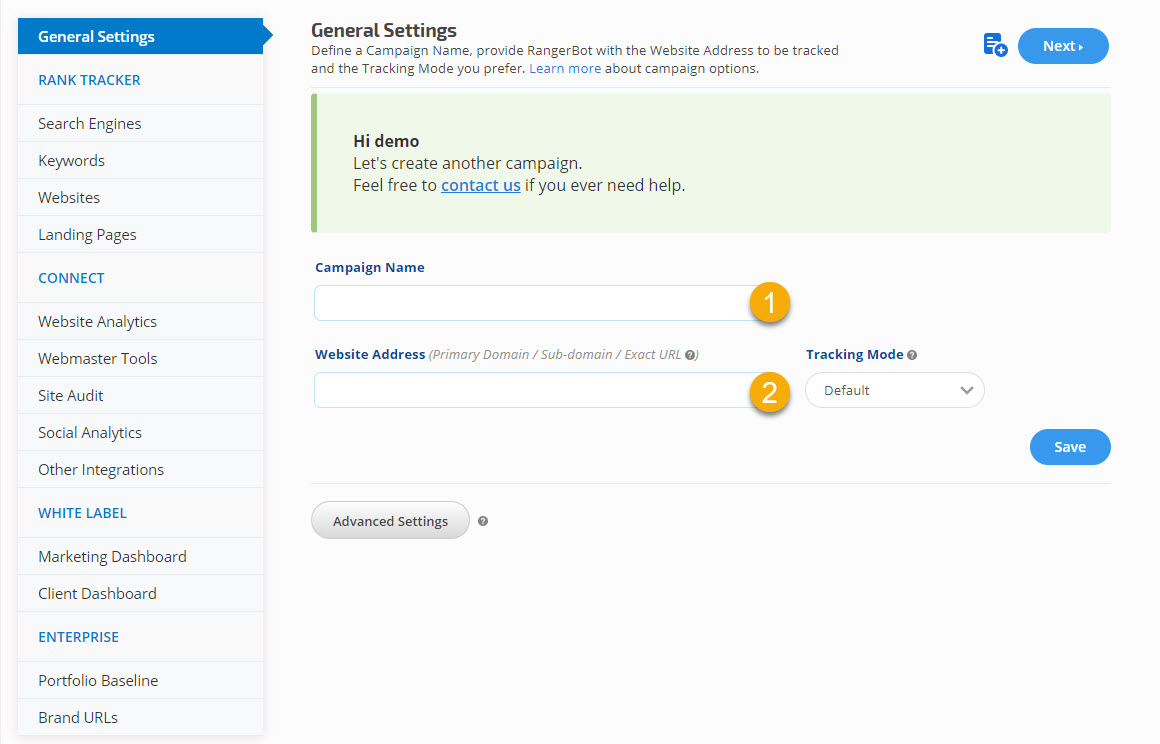
Enter Campaign Name and Website Address
The Campaign Name displays in reports so that it should be descriptive of the web property.
The Website Address needs to be entered based on the type of Tracking Mode you select:
The Campaign Name displays in reports so that it should be descriptive of the web property.
The Website Address needs to be entered based on the type of Tracking Mode you select:
- If you want rankings for the full site or are using our Target URL feature, then enter the domain name and extension only (e.g., your-site.com). This will include sub-domains (e.g. blog.your-site.com)
- If you want rankings for the site without subdomains, then enter the www.your-site.com, which will not include rankings for any sub-domain that are under your-site.com
- If you want rankings only for a sub-domain, then enter the sub-domain address (e.g., members.your-site.com)
- If you only want to track rankings for a specific sub-directory, then enter the domain and sub-directory (e.g., your-site.com/products/*)
- If you only want to track rankings for a specific web page, then enter the full URL (e.g., your-site.com/your-page.html). For this type of tracking, you must select the Exact URL Tracking Mode.
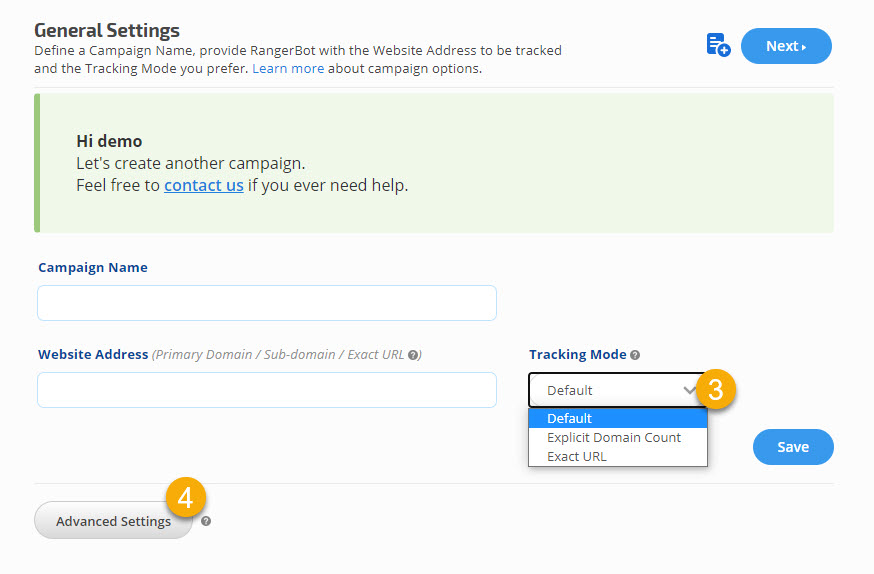
Select a Tracking Mode
Default (applies to Domains or sub-domains)
This setting instructs RangerBot to count rank positions exactly as is when checking your rankings in search engine results. Select this if you want to monitor rank for all pages in a domain (e.g., yoursite.com/*) or a sub-domain (e.g., *.yoursite.com/*) of the site.
In case, you require to use the domain without a sub-domain (eg. yoursite.com without locations.yoursite.com), we recommend adding a global Targeted URL to the Keyword list with wild cards(eg. yoursite.com/*).
Explicit Domain Count (applies to Domains or sub-domains)
When checking your rankings this option instructs RangerBot to ignore duplicate domains in search engine results. (More information and examples). Select this if you want to monitor rank for all pages in a domain (e.g., yoursite.com/*) or a sub-domain (e.g., *.yoursite.com/*) of the site.
Exact URL Ranking (applies to Sub-Directory or a Specific Page)
Monitoring Exact URL rankings means that you are interested in tracking the rank of a specific landing page or website sub-directory (e.g., your-site.com/products/*). When you choose this option RangerBot reports the results only if the exact URL matches the search engine result.
Exact URL Ranking can be used when you want to monitor:
- sub-directories (e.g., http://your-site.com/subdirectory)
- specific landing pages (e.g., http://yoursite.com/yourpage.html)
- YouTube channel pages or individual videos (e.g., https://www.youtube.com/channel/brand-name or https://www.youtube.com/watch?v=mDZcw2D-LaQ)
- An App in the Google Play Store or Apple iTunes store (e.g., https://play.google.com/store/apps/details?id=com.rankranger.ranktracker)
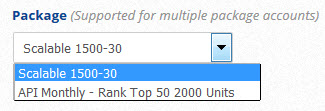
Package
If your account contains multiple packages, it's important to select the correct package to store the new campaign in before clicking the Save button.
Click the Advanced Settings button to enter reference information, set up a Google Drive connection, and delete or archive a campaign.
If your account contains multiple packages, it's important to select the correct package to store the new campaign in before clicking the Save button.
Click the Advanced Settings button to enter reference information, set up a Google Drive connection, and delete or archive a campaign.
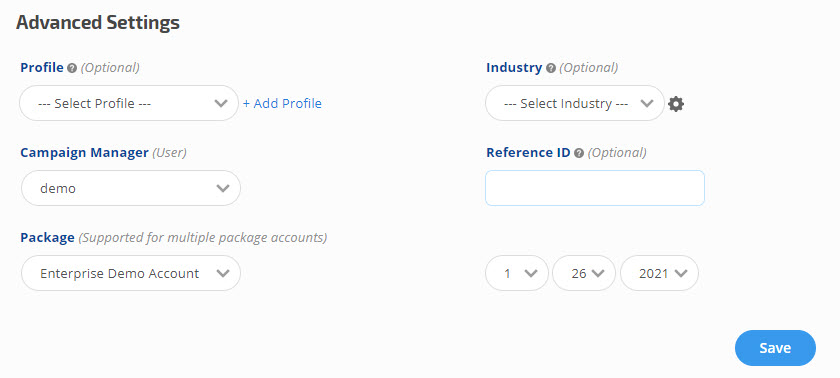
In the Advanced Settings section of this screen:
- You may personalize the campaign with a Profile, Industry, and Reference ID that your company can define as needed.
- If your account contains more than one package, it's very important that you click Advanced Settings and select the package that you want the campaign added to.
- You may assign a Campaign Manager (from your list of account sub-users) to each campaign (this setting is just a label to show who is the manager for the campaign. To assign permissions, click on the person icon on the top left and choose Manager Users or go to User Profile & Subscriptions and choose: Manage Users. Then click on the pencil to edit the user you assigned to be a Campaign Manager and scroll to the Permissions section where you can assign additional permissions)
- You can connect the campaign to a Google Drive account
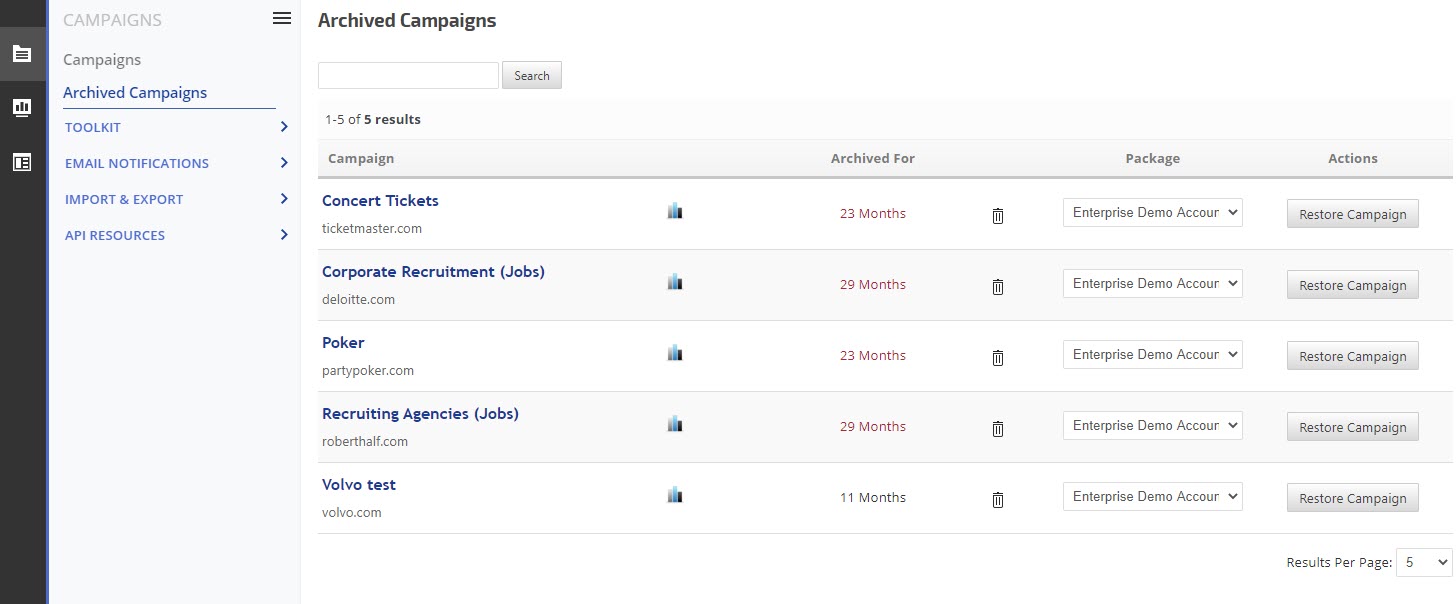
- You'll find permanent Campaign Deletion and Campaign Archive (available in Enterprise packages) options.
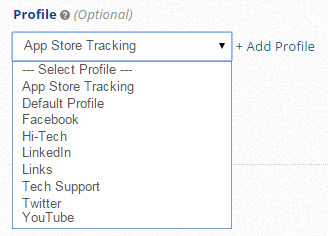
Campaign Profiles (optional)
Select a Profile to organize rank tracking and backlink management campaigns into associated groups for report filtering. Refer to Create Profiles for more information about adding and editing profiles.
Campaign Industry (optional)
You can select or add an Industry (optional) for use in filtering campaigns on the Home screen.

You can select or add an Industry (optional) for use in filtering campaigns on the Home screen.
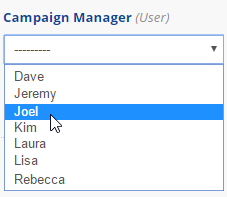
Campaign Manager
You may assign a Campaign Manager (from your list of account sub-users) to each campaign
You may assign a Campaign Manager (from your list of account sub-users) to each campaign
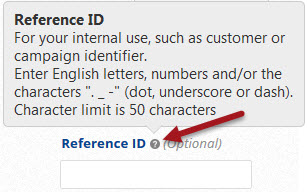
Reference ID (optional)
You can add a Reference ID for internal use and retrieve campaign data via API using this reference ID.
Reference IDs are limited to 50 characters and must be English letters or numbers and may contain a dot, dash, or underscore.
Connect Google Drive
After you connect a Google Drive to your account, you can integrate it with a campaign via the Campaign General Settings screen to enable the export of reports directly to a Rank Ranger campaign folder in your Drive.
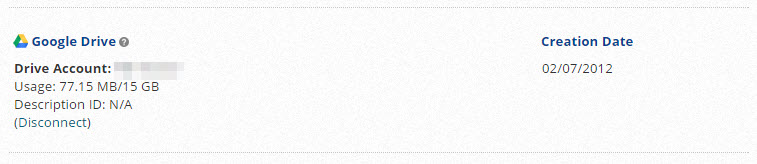
After you connect a Google Drive to your account, you can integrate it with a campaign via the Campaign General Settings screen to enable the export of reports directly to a Rank Ranger campaign folder in your Drive.
Enterprise packages have access to a campaign Archive feature which allows the campaign settings and history to be stored for future reference but stops the rank tracking. Once keyword tracking is stopped, the campaign is no longer counted in the package capacity. To archive a campaign, click the Archive Campaign button.

Email automated PDF reports can contain graphs and reports from multiple campaigns, so it's important when you archive a campaign to set the associated PDF report(s) to Pause or delete them.
Archived campaigns can be viewed in the Enterprise section. To activate rank tracking of an Archived campaign, click the Restore Campaign button (restoring a campaign returns it to active keyword tracking status and therefore the campaign keywords are again counted toward available package capacity).
Campaign deletion is permanent, so only click the Delete Campaign button if you are absolutely certain that you will never need the campaign data again. We recommend running a Campaign Rank Backup prior to deletion just in case you someday need the rank data.
When someone attempts to delete a campaign, the system pops up this warning message indicating that campaign deletion is permanent, all data is lost if they click the Yes button acknowledging the warning. For the protection of account owners, the warning includes a recommendation to create a campaign rank backup before deleting the campaign and advises customers with Enterprise packages to consider archiving the campaign instead of deleting it.
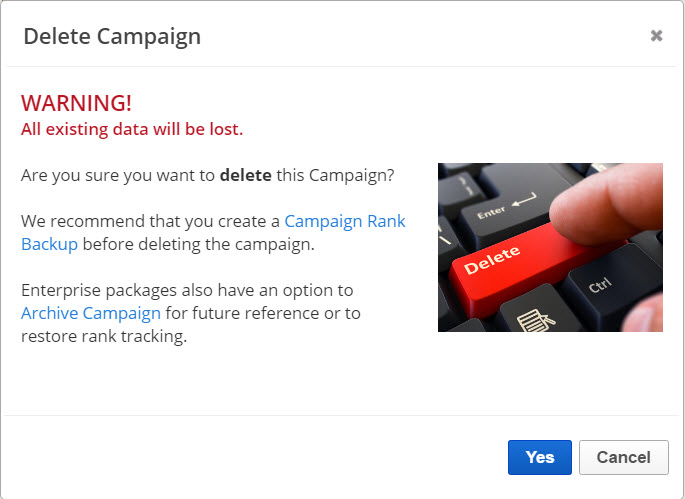
If a campaign is deleted in error, and the campaign backup was run prior to deletion, then the campaign can be restored from that backup file by converting the data to the historical rank import file format.
To avoid any confusion regarding who deleted a campaign, we recommend that each user only be given access to an account with their own individual User login credentials.
Campaign Settings changes when migrating to HTTPS
When you migrate a website from HTTP to HTTPS, if your campaign General Settings tracking mode is set to Default or Explicit Domain Count, then you do not need to change anything in the campaign Rank Tracker settings. Those tracking modes cause Rank Ranger to deliver results for the website's HTTP, HTTPS, sub-domains and sub-directories.
Website Default Tracking Mode
Website Exact URL Tracking Mode
If you are using the Exact URL tracking mode with a full URL such as this:
http://domain.com/sub-directory
then you need to change the http:// to https:// in the Website Address field and click the Save button.
If you are using the Exact URL tracking mode with a full URL such as this:
http://domain.com/sub-directory
then you need to change the http:// to https:// in the Website Address field and click the Save button.